tutorial

How to get more slack in cables

I got this pro-tip during a sock competition years ago (can’t remember if it was Sock Madness or Tour de Sock) and figured now was a good time to share it with you, since I’m about to release a Very Cabled sock pattern!

I use this technique for cables that involves 4 or more stitches.

The technique is: add a yarnover in the middle of the cable stitches on the round/row BEFORE you work the cable. Then, when it’s time to work the cable, drop the YO and let the slack be distributed across the cable stitches, making them easier to work.

This is an approximate science, so putting the YO close to the center for cables with an uneven number of stitches works fine. For really massive cables (I once knit a cowl with a 6/6 cross) I might add two yarnovers!

One thing to note - adding slack like this makes the cable stitches easier to knit into, but doesn’t make the finished fabric that much looser. So still plan to size up however you normally do to ensure the FO fits.

I made a video demonstrating this method, which you can check out here:

Break even with your stash in 2022!

I’ll preface this by saying…I did not succeed at breaking even in 2021. That said, I’m keen to try again!

Here’s the overall concept: track your stash ins and outs from January 1 to December 31 and try to reach a net of zero.

I got this idea from the Knit Picks Stashdown (and more) group on Ravelry, which had a challenge in 2021 called “Even Stevens.” I didn’t think I could manage a dramatic stashdown, but at least aiming to have as much yarn going out as in appealed to me. Maybe it will appeal to you to!

What counts as “stash in”? Generally, any yarn you buy or receive as a gift would count. However, if you want to give yourself a freebie on your birthday or other special yarn-buying even, go ahead!

What counts as “stash out”? Any yarn worked into a finished object or given/sold to someone else. One thing I noticed in 2021 was that partial skeins caused some stress. For example, I bought 400g of fingering weight to knit a sweater. The finished sweater only used 360g, so even though I did good by knitting this stash, I still had a positive net of 40g. If that will frustrate you, then feel free to log finished objects as full skeins! Maybe by next year I’ll have thought up a separate challenge for scraps specifically…

Anyway, I’m planning to track my stash ins and outs again this year, and I thought you might like to try it too!

For my digital peeps, I made a spreadsheet you can save to your Google Drive. All you have to do is enter your ins as positive numbers and outs as negative numbers, and the spreadsheet will auto-calculate your progress.

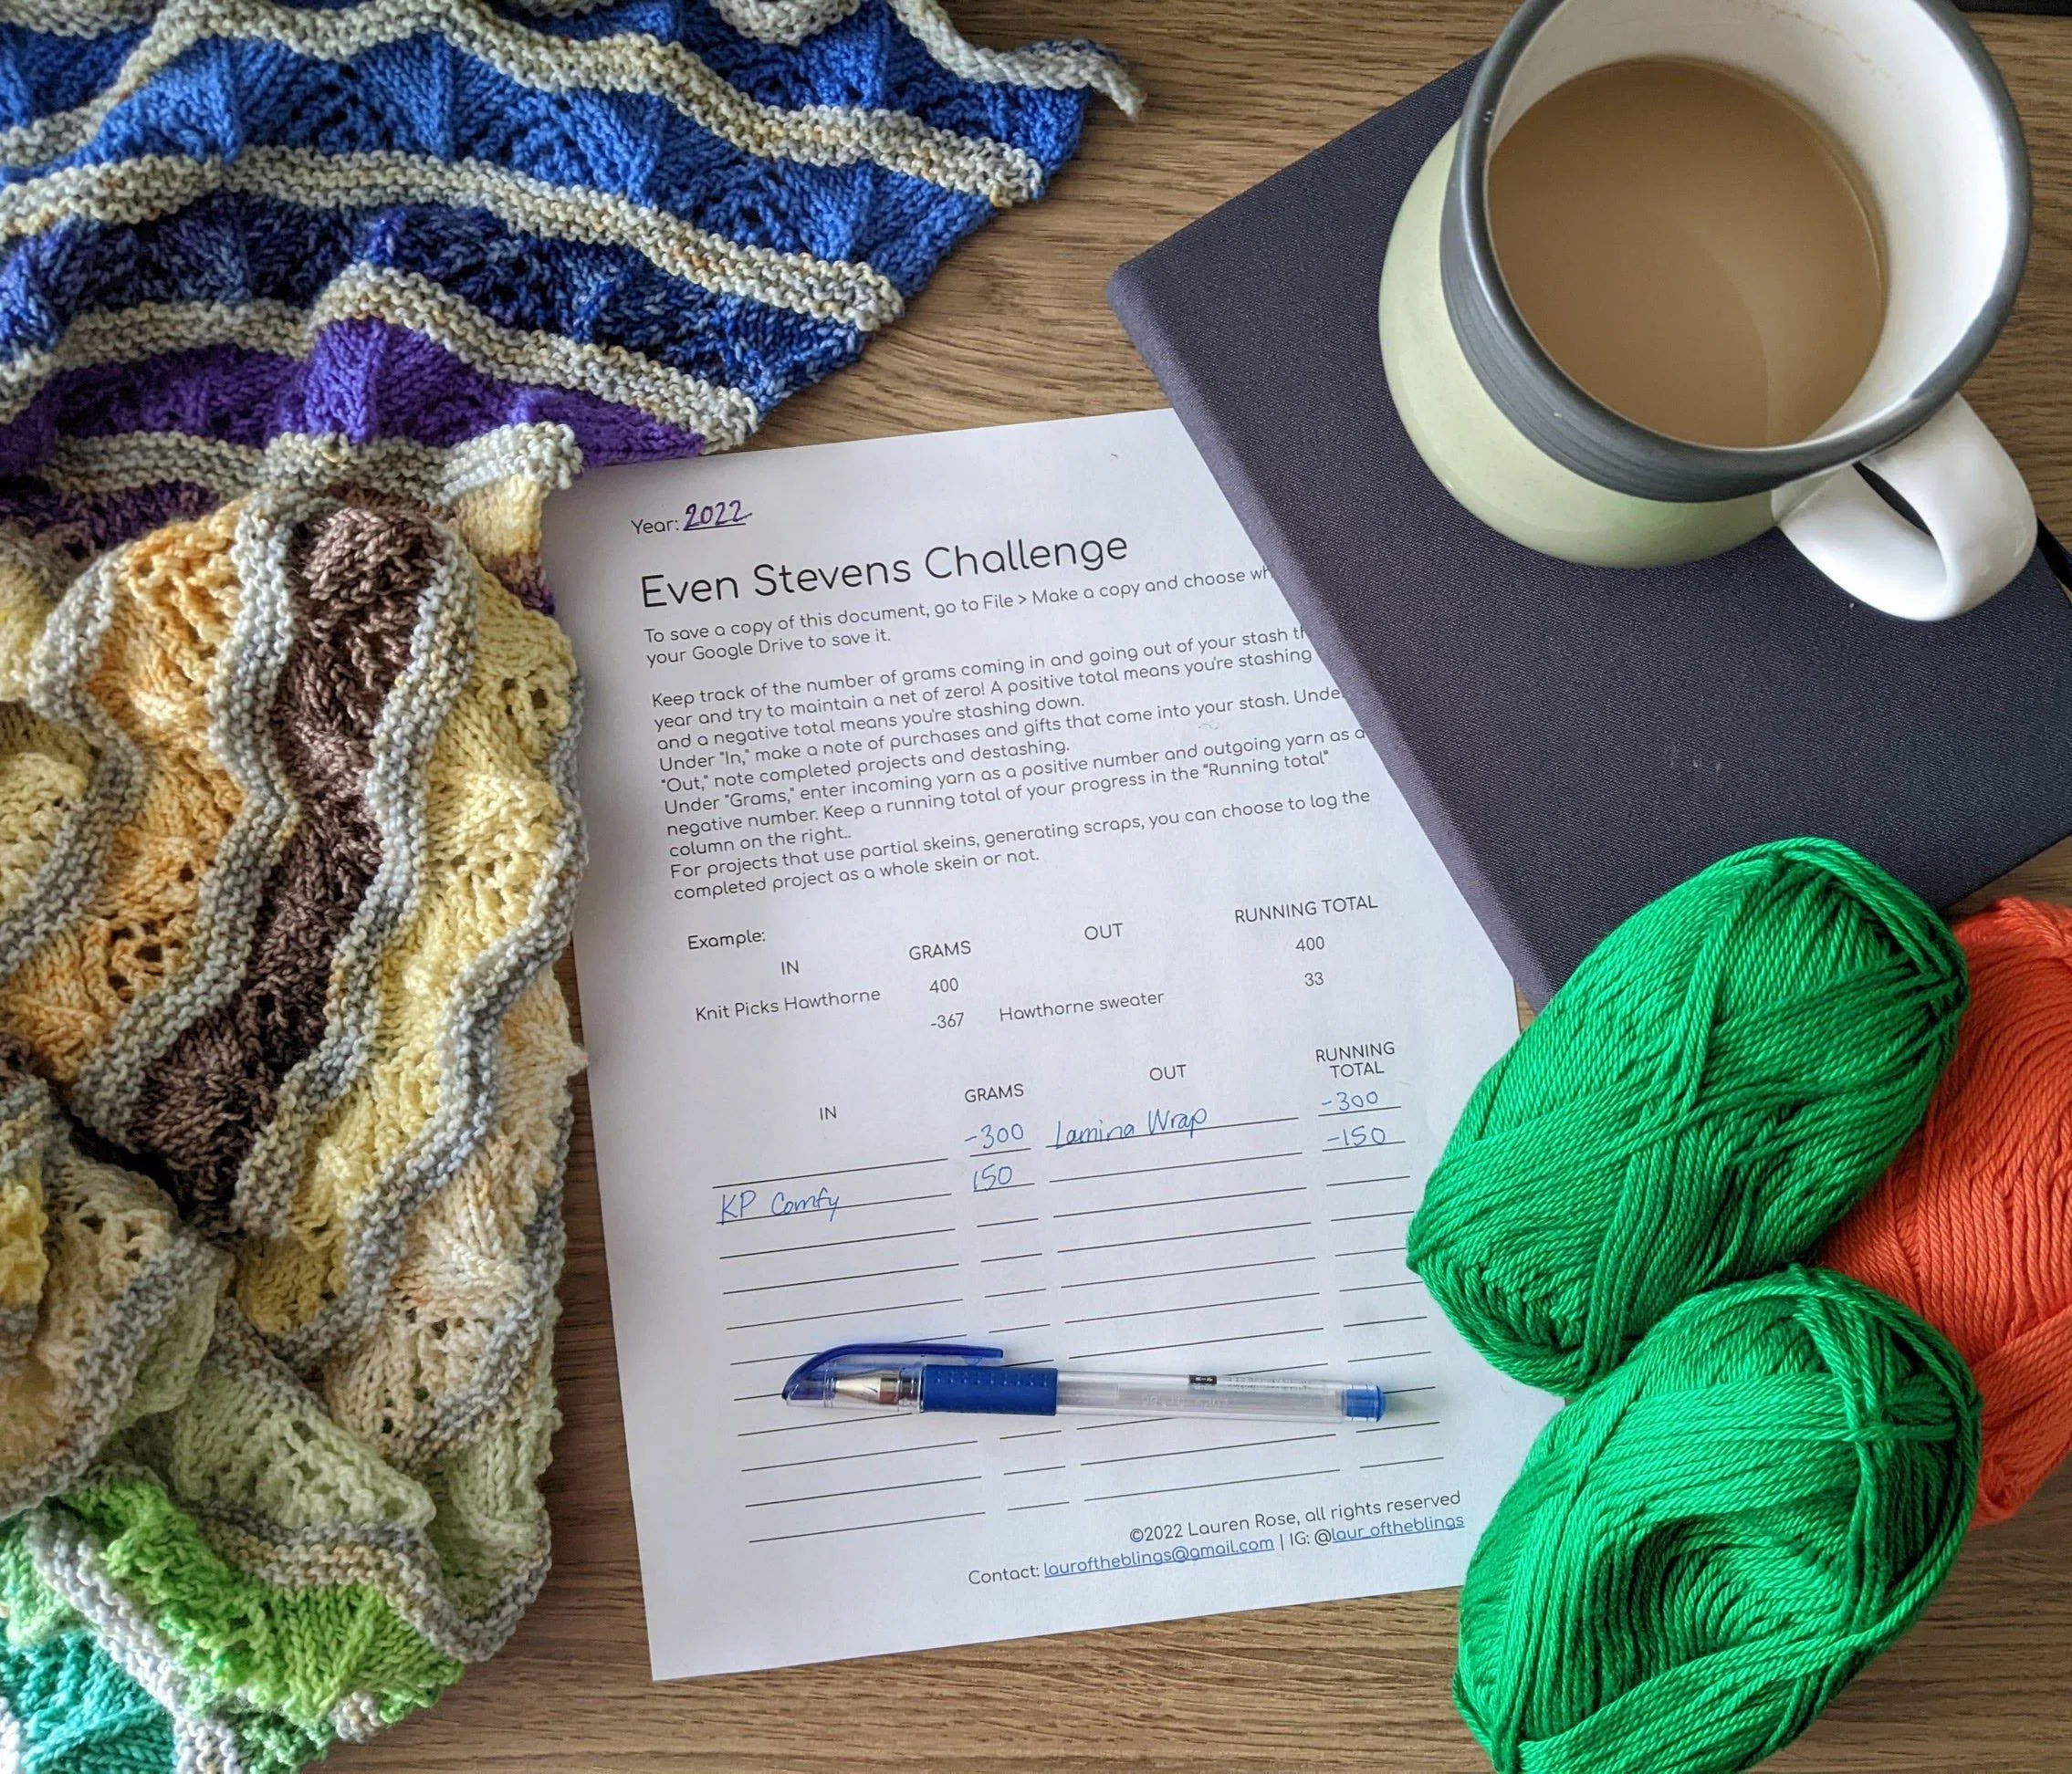
For my paper planner fans, I’ve got a printable document - again you’ll track your ins as positive numbers and outs as negative numbers, but you have one extra step: calculating the running tally of stash.

The Even Stevens printout on a desk, with 2 stash in/outs filled in, framed by a handknit lace shawl, 3 balls of yarn, and a cup of coffee

Ready to start tracking your stash? Sign up for my newsletter and get both forms now! (Current subscribers - you should only get an email with the forms and not get duplicate emails of future newsletters, etc.)

Sock hacks

I’ve been designing a lot of socks lately and I sometimes have to stop myself from going off on a dissertation-length tangent about different ways you can modify your socks for better fit. There’s nothing wrong with including pro-tips here and there in patterns, but when you’re (well, I’m) adding paragraphs and paragraphs it starts to get beyond the scope of the pattern!

So instead I’ll share some noodling I’ve had here.

First is calf-shaping - depending on the stitch pattern, you can add calf-shaping to just about any sock. I won’t say ALL because I’m sure there’s something out there with an incredibly intricate pattern that would need a lot of massaging to make extra stitches and decreases work, but I think most patterns would allow this.

I regret not specifying this more clearly in earlier sock patterns I wrote with calf-shaping, but all extra stitches should be added to the back of the leg, rather than splitting the total stitch count evenly across instep/back of leg. This is more of an issue in cuff-down socks than toe-up, because it affects the stitch count coming into the heel section. (In toe-up, you will have already worked the heel by the time you’re adding increases for calf-shaping, so you only need to worry about centering any motifs on the back of the leg with additional stitches in the mix.)

Two hand-knit socks in light gray yarn, worked in reverse stockinette with a pattern in stockinette that looks like spooky fingers grabbing the leg. The sock on the right is in the middle of the heel flap

Two hand-knit socks in light gray yarn, worked in reverse stockinette with a pattern in stockinette that looks like spooky fingers grabbing the leg. The sock on the right is in the middle of the heel flap

So if you’re knitting a cuff-down sock and want to cast on 78 stitches and decrease to 72 at the heel, you should split the stitches into 36 instep stitches and 42 back of leg stitches. That’s 6 extra stitches on the back, which will be decreased in pairs, so 3 decreases on the way to the heel and you’ll be ready to work the 72-st size heel across 34 sts as written. This means the patterning will be centered on the front and back of the sock, and you won’t need to rearrange stitches between the instep/back of leg sections before working the heel.

Next, heel flaps! The convention is to work as many rows in the flap as you have in the heel. So, a heel worked across 32 sts will be worked for 32 rows and create a nice little square. That…has never worked for me. Part of it is because my row gauge is really, really tight compared to most people, so I need to work way more rows to even get a square shape. Another part of it is even if I do get a nice square flap, that’s not actually enough length in the gusset to fit my foot!

I saw a tip…somewhere. Sock Madness? A Facebook sock knitting group? Recommending that you knit the heel flap as long as your thumb (from fingertip to the second/big knuckle). This will likely be somewhere between 2 and 3 inches. Since I’ve started doing that, my heel flap socks fit way better, and no longer get sucked underneath my foot!

If adding more rows, keep in mind you’ll need to pick up additional stitches for the gusset. For the most part, this just means you’ll keep knitting gusset decreases for longer than called for in pattern. In some cases, there might be special patterning on the sole like colorwork or riverbed decreases (google “riverbed gusset” to see what I mean), but in general more gusset stitches won’t impact the pattern.

Related to this, don’t forget to pick up stitches in the gap between the end of the heel flap and the beginning of the instep! Most patterns call for at least 1, but 2 is fine too. You might even find that one side needs more stitches than the other and end up with 19 gusset stitches on the right compared to 18 on the left - also fine! For this I’ll sometimes work a double decrease on the side with more stitches on the first round of decreases to even things up (and so I don’t have to remember which side needs an extra decrease at the end of the gusset).

Since feet aren’t always exactly the same size as calves, remember that you can tailor the fit of a sock foot by decreasing on the sole. This maintains whatever pattern on the instep but allows for a snugger fit! When you get to the toe, you have a few options to even things up in preparation for grafting.

If you have 4 or more stitches extra on the instep, send some around to the sole. For example, with 34 sts on the instep and 30 on the sole, send 1 st on either side of the instep around to the sole. Now they’re split evenly into 32!

If you have just 2 sts extra, start toe decreases a little early and work increases ONLY on the instep. For example, with 32 instep and 30 sole sts, work a decrease round only on the instep, evening them up to 30 sts each.

These are the kinds of things you learn after knitting a bunch of socks and seeing how various constructions and stitch counts fit on your foot, but I hope this helps at least one person jump start their journey into custom sock modifications!

You don't have to get gauge

You don’t have to get gauge!!

Thanks to the pandemic, much of my at home time is now devoted to reading about all things knitting on all the various social channels I have. One thing I’ve noticed is a slate of posts lamenting an inability to get the specified gauge on a pattern. Another related-to-this-post topic is folks getting gauge but not liking the fabric they created.

Therein lies the key! It’s better to aim for a fabric you actually like, or one you can achieve, and see if you can work a different size of the pattern to compensate.

Caveat: I realize that this could be difficult depending on your size and the sizes available in the pattern. For that, I will continue to advocate for a wide range in sizes for knitwear design in general and provide that in my own patterns!

Example one: you swatch to get a gauge of 5 stitches per inch for a fingering weight sweater. But the yarn you’re using is on the lighter side, and 5 stitches per inch is airy enough that folks might get a show of what’s under your sweater instead of admiring your hand-knit FO! You’d prefer to knit closer to 6 stitches per inch to get a denser fabric.

There’s a good chance you can use the pattern you already have, but knit a different size that will give you the perfect combo of gauge + size. You can also use this technique on individual parts of patterns like sweater sleeves.

First, you’ll need to know your bust circumference + your desired ease.

Inches:

Let’s take a 40 inch bust + 2 inches of positive ease. 42 inches multiplied by 5 stitches per inch would give me 210 stitches at the widest part of the bust in the pattern gauge.

In my preferred gauge of 6 stitches per inch, 42 * 6 would give me 252 stitches. Find the section of the pattern where you have all the body stitches on the needle (that’s front + underarm + back + underarm, so make sure you find the part AFTER the sleeve separation and underarm cast-on!). Do any of the sizes have a body stitch count close to 252? That’s the size you want to knit!

Centimeters:

Same size but slightly different math. We’ll need to adjust the gauge calculation - it will be (6/2.5), giving us 2.4 stitches per cm.

100 cm bust + 5 cm of positive ease will be 105 cm, multiplied by 2.4 stitches per cm, giving us 252 stitches! Find a size with a body stitch count close to 252 and you’re ready to go.

In this example, because you have a tighter gauge than the pattern, you’ll end up knitting a larger size, but the reverse could also be true if you want to knit a looser gauge by knitting a smaller size!

Unfortunately, this method isn’t a silver bullet for accommodating differences in gauge - if you’re already knitting one of the largest sizes available in the pattern, it will be hard to use a tighter gauge to knit a larger size as those numbers may not be available in pattern. Similarly, if you’re knitting one of the smallest sizes, you may not be able to knit a looser gauge and a smaller size. In the same vein, you probably won’t be able to reimagine a pattern written for fingering weight in bulky weight, or vice versa.

Cuff-down heel-flap sock recipe

Thanks to a random post in a sock knitting group on FB, I finally looked up the mathematical guidelines for a heel flap construction. I found that answer here (thank you very much Sara Morris Design!)

Of course, knowing the specific calculations, I couldn’t just leave it there, I had to make a spreadsheet! Having just finished the Sizing With Spreadsheets course from Swanky Emu Knits, rather than just plopping the heel calculations into a spreadsheet and calling it a day, I spent a few hours yesterday and today putting together a pattern from start to finish that incorporates the heel math. The spreadsheet is here.

Please note, in order to keep a clean base copy you can’t edit this sheet directly - you must go to File > Make a copy to save it for yourself.

Select your gauge and desired ease from the drop-down menus, then enter your leg and foot measurements in the fields below. After that, your personalized sock recipe will populate in the pattern text below! Gauge options range from fingering to DK/worsted, and both inches and centimeters are provided.

If you’re just interested in a free vanilla sock pattern, feel free to stop reading here!

If you’re interested in possibly creating your own spreadsheet, here’s a rundown of the math I used.

Cuff

Since this is a cuff-down sock, we’ll start with the circumference on the leg in inches or centimeters

Socks typically have negative ease, so now we need to decide how much negative ease. In my internet travels, I’ve seen 10% referenced a lot. I discovered that I personally prefer something closer to 20%. For the purposes of this spreadsheet, I decided to offer a range because WHY NOT but you can also stick with one if you’re doing a particular kind of design!

Negative ease = leg circ. * .1 (for 10%, replace with desired percentage)

We’ll use the leg circumference LESS negative ease to figure out how many stitches to cast on:

Cast-on circumference = leg circ. - negative ease

Now we need to know the gauge - this can be whatever works for your yarn weight. For ease of calculations, I used the same for both in & cm calculations - how many stitches do you get in either 1 in or 2.5 cm? This doesn’t have to be a whole number, either, because we’ll take care of that next.

Number of stitches to cast on = (cast-on circ. * gauge) rounded to a whole number

For reasons that will become important later, I actually recommend rounding this to a multiple of 4.

Divide this number in half - that’s the stitch count for the front/back of the leg and will be used in the heel and toe.

After this, knit your cuff and leg as desired, then move onto the heel!

Heel flap

The heel flap can be whatever style you want (though usually something with more thickness like slipped stitches or garter is recommended since stockinette could wear through more quickly).

Most places I’ve referenced have said that the number of rows in the heel flap should equal half of the cast-on count. (So I guess that would mean the rule is (half of your leg circ. - neg ease)?) I’ve found that slip-stitch heels feel pretty short when I only work half the cast-on amount in rows, so this won’t work for me.

At some point during Sock Madness, I saw a comment that said to knit to the length of your thumb on the heel flap. Since starting to do that, I’ve found my heel flaps have been sufficiently deep, so I’m using it! Of course, if you have a better measurement to base the heel flap on, I’m all ears! Let me know if comments.

On the heel flap, knit an even number of rows and end after a purl row.

This is where I thank Sara Morris Designs for her blog post of wisdom.

Heel flaps generally have a flat portion around which the decreases occur - the blog post recommended 10% of the total cast-on count, and to round down. (There’s another bit about whether to make this number even or odd to match half of your stitch count, but I can’t figure out how to express that in calculations yet so I’m skipping it.)

Center of heel flap = (Total cast-on * .1) rounded down to the nearest whole number

The decreases need to be centered on the heel, so now we figure out how to approach that first heel turn row:

(Center of heel flap + half stitch count) / 2

You’ll knit that many, ssk, k1, and turn.

How many to purl back = Center of heel flap + 1

Purl that many, p2tog, p1, turn.

And continue until all heel stitches are worked!

Gusset

How many stitches to pick up on each side of heel flap = Rows in heel flap / 2

You’ll probably also want 1 or 2 in the gap where you resume working across the instep!

Decrease every other round until you get to your foot circumference - the circumference around the ball of your foot.

Foot circumference is calculated the same way as the calf - Subtract your desired negative ease from the total measurement, then multiply by the stitch gauge.

Toe

For a wedge toe, I aim to decrease to 2/3 of the total stitches doing increases every other round, then to 1/3 of the total stitches every round. To figure out how long the toe will be (and thus where you need to start it…)

Rounds for every-other-round decreases = total stitches - 2/3 total stitches

Rounds for every-round-decreases = (2/3 stitches - 1/3 stitches) / 2

Add up for the total number of rounds, then divide by your round gauge. That’s how long the toe will take, so subtracting it from your total foot length will tell you where to start!