how-to

How to get more slack in cables

I got this pro-tip during a sock competition years ago (can’t remember if it was Sock Madness or Tour de Sock) and figured now was a good time to share it with you, since I’m about to release a Very Cabled sock pattern!

I use this technique for cables that involves 4 or more stitches.

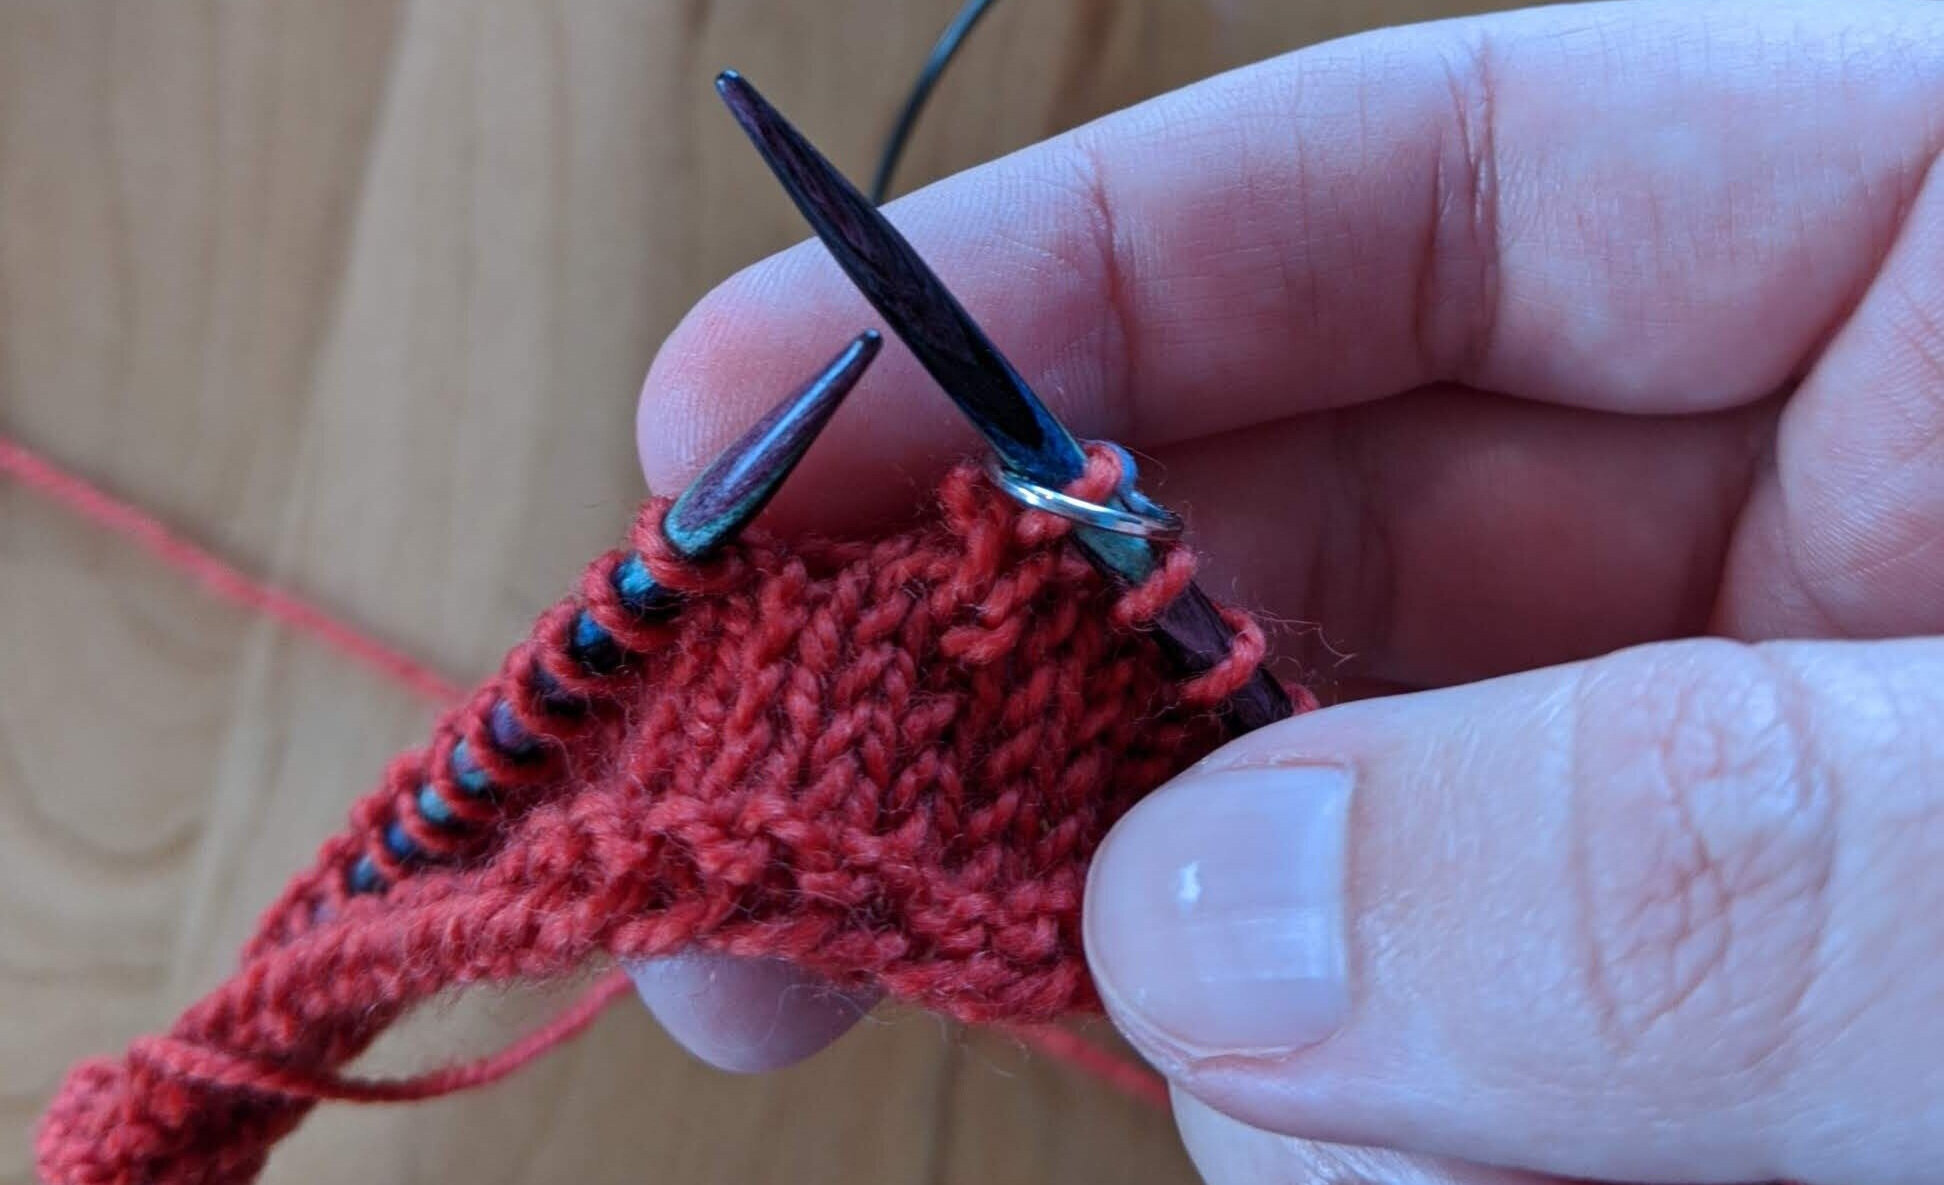
The technique is: add a yarnover in the middle of the cable stitches on the round/row BEFORE you work the cable. Then, when it’s time to work the cable, drop the YO and let the slack be distributed across the cable stitches, making them easier to work.

This is an approximate science, so putting the YO close to the center for cables with an uneven number of stitches works fine. For really massive cables (I once knit a cowl with a 6/6 cross) I might add two yarnovers!

One thing to note - adding slack like this makes the cable stitches easier to knit into, but doesn’t make the finished fabric that much looser. So still plan to size up however you normally do to ensure the FO fits.

I made a video demonstrating this method, which you can check out here:

Cuff-down heel-flap sock recipe

Thanks to a random post in a sock knitting group on FB, I finally looked up the mathematical guidelines for a heel flap construction. I found that answer here (thank you very much Sara Morris Design!)

Of course, knowing the specific calculations, I couldn’t just leave it there, I had to make a spreadsheet! Having just finished the Sizing With Spreadsheets course from Swanky Emu Knits, rather than just plopping the heel calculations into a spreadsheet and calling it a day, I spent a few hours yesterday and today putting together a pattern from start to finish that incorporates the heel math. The spreadsheet is here.

Please note, in order to keep a clean base copy you can’t edit this sheet directly - you must go to File > Make a copy to save it for yourself.

Select your gauge and desired ease from the drop-down menus, then enter your leg and foot measurements in the fields below. After that, your personalized sock recipe will populate in the pattern text below! Gauge options range from fingering to DK/worsted, and both inches and centimeters are provided.

If you’re just interested in a free vanilla sock pattern, feel free to stop reading here!

If you’re interested in possibly creating your own spreadsheet, here’s a rundown of the math I used.

Cuff

Since this is a cuff-down sock, we’ll start with the circumference on the leg in inches or centimeters

Socks typically have negative ease, so now we need to decide how much negative ease. In my internet travels, I’ve seen 10% referenced a lot. I discovered that I personally prefer something closer to 20%. For the purposes of this spreadsheet, I decided to offer a range because WHY NOT but you can also stick with one if you’re doing a particular kind of design!

Negative ease = leg circ. * .1 (for 10%, replace with desired percentage)

We’ll use the leg circumference LESS negative ease to figure out how many stitches to cast on:

Cast-on circumference = leg circ. - negative ease

Now we need to know the gauge - this can be whatever works for your yarn weight. For ease of calculations, I used the same for both in & cm calculations - how many stitches do you get in either 1 in or 2.5 cm? This doesn’t have to be a whole number, either, because we’ll take care of that next.

Number of stitches to cast on = (cast-on circ. * gauge) rounded to a whole number

For reasons that will become important later, I actually recommend rounding this to a multiple of 4.

Divide this number in half - that’s the stitch count for the front/back of the leg and will be used in the heel and toe.

After this, knit your cuff and leg as desired, then move onto the heel!

Heel flap

The heel flap can be whatever style you want (though usually something with more thickness like slipped stitches or garter is recommended since stockinette could wear through more quickly).

Most places I’ve referenced have said that the number of rows in the heel flap should equal half of the cast-on count. (So I guess that would mean the rule is (half of your leg circ. - neg ease)?) I’ve found that slip-stitch heels feel pretty short when I only work half the cast-on amount in rows, so this won’t work for me.

At some point during Sock Madness, I saw a comment that said to knit to the length of your thumb on the heel flap. Since starting to do that, I’ve found my heel flaps have been sufficiently deep, so I’m using it! Of course, if you have a better measurement to base the heel flap on, I’m all ears! Let me know if comments.

On the heel flap, knit an even number of rows and end after a purl row.

This is where I thank Sara Morris Designs for her blog post of wisdom.

Heel flaps generally have a flat portion around which the decreases occur - the blog post recommended 10% of the total cast-on count, and to round down. (There’s another bit about whether to make this number even or odd to match half of your stitch count, but I can’t figure out how to express that in calculations yet so I’m skipping it.)

Center of heel flap = (Total cast-on * .1) rounded down to the nearest whole number

The decreases need to be centered on the heel, so now we figure out how to approach that first heel turn row:

(Center of heel flap + half stitch count) / 2

You’ll knit that many, ssk, k1, and turn.

How many to purl back = Center of heel flap + 1

Purl that many, p2tog, p1, turn.

And continue until all heel stitches are worked!

Gusset

How many stitches to pick up on each side of heel flap = Rows in heel flap / 2

You’ll probably also want 1 or 2 in the gap where you resume working across the instep!

Decrease every other round until you get to your foot circumference - the circumference around the ball of your foot.

Foot circumference is calculated the same way as the calf - Subtract your desired negative ease from the total measurement, then multiply by the stitch gauge.

Toe

For a wedge toe, I aim to decrease to 2/3 of the total stitches doing increases every other round, then to 1/3 of the total stitches every round. To figure out how long the toe will be (and thus where you need to start it…)

Rounds for every-other-round decreases = total stitches - 2/3 total stitches

Rounds for every-round-decreases = (2/3 stitches - 1/3 stitches) / 2

Add up for the total number of rounds, then divide by your round gauge. That’s how long the toe will take, so subtracting it from your total foot length will tell you where to start!

Make a helper foot for socks

How do you measure socks when knitting? I’ve seen lots of tutorials that involve simply putting on the sock WIP and measuring it against your actual foot and I’ve seen lots of photos of very nice “sock rulers” that can be bought but not necessarily customized to your actual foot.

I typically take my knitting with me on my commute, so pulling off my shoes in order to try on an in-progress sock is not an option for me. Instead of buying a generic sock ruler, I decided to make one exactly customized for me:

You’ll need:

  • sturdy cardboard or posterboard

  • a pen or marker

  • a helpful friend or decent flexibility

  • an actual ruler

  • scissors

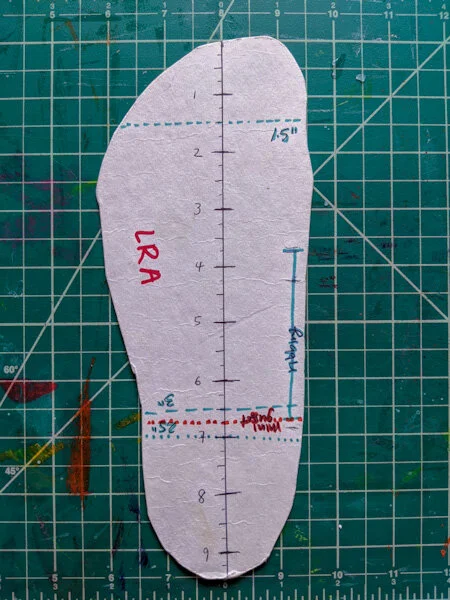
Close-up of the heel part of the cardboard foot. Two dashed lines indicate 3” and 2.5” away from the end of the heel. A line at 2.75” is labeled “mini gusset.”

Now you can pull out your “foot” wherever you are and get a quick measurement! This works for both toe-up and cuff-down patterns, and also makes it easy to see the stitch pattern stretched out like it would be across the instep. If you make them for folks you frequently knit socks for, don’t forget to label them!

Do you have a foolproof method for measuring your socks? Tell me about it on comments!

A cardboard cutout of a foot placed next to a ruler. The ruler is being used to add measurement marks to the cardboard.

The steps:

First, place your dominant foot on the cardboard and put weight on it. Have a friend trace the shape of your foot onto the cardboard. Cut out the foot shape (it’s fine and probably preferable to make the toes rounded like a mitten rather than have a scalloped edge).

Take your ruler and draw a line down the center (long-ways, from toe to heel), then add in ruler measurements. I went ahead and added notations for measurements I typically see in sock patterns, such as where to begin a fleegle/strong heel gusset, mini-gusset, short-row heel, or toe decreases. (Your specifics may vary - use whatever makes sense for the size of your foot and the types of sock patterns you normally knit!) I also added a measurement for ribbing on the arch of my foot. If you have modifications you find yourself making time after time, throw them on there!

Close-up of the toe of the cardboard foot. A dashed line indicates 1.5” from the end of the toe.
The finished helper foot displayed on a green lined backdrop. In addition to the measurement lines on the heel and toe, there’s a vertical line at the arch of the foot labeled “ribbing” and the letters “LRA” written along the blade of the foot.

Perfect corner pick-ups for mitered square blankets

Those of you who’ve seen even a little bit of my knitted FOs know that I’m a complete sucker for rainbows!!! And I’m currently undertaking that ubiquitous step on my knitting journey of...knitting the Hue Shift Afghan.

This pattern is written by and published by Knit Picks. They have some pre-made kits for sale, but you can also swap colors in and out to create your own color palette. (This isn’t a sponsored post or anything, I just think that’s cool!)

One of the most common modifications I see for this pattern is working only the center spine CDD stitch as always-stockinette (so, purling it on the WS), rather than garter stitch. This creates a really clean diagonal line across each square, and, for me anyway, makes it easy to know when you’ve hit the center stitch and need to work the CDD.

When adding a new square to the blanket, it’s possible to pick this CDD stitch up in such a way that the line of stockinette center stitches continues across all of the squares! It only took me, oh, 30 squares or so to get it right, so I want to share it here for posterity.

I work the center stitch as a CDD on the right side and a purl on the wrong side, which means the center spine is comprised of two stitches in each color for the striped squares. I think the striped squares make what I’m describing easier to see, so I’ll use those as my example.

You’ll either be casting on or picking up stitches on the way to this CDD stitch, so do those as you will. I personally slip the stitches at the end of each row with yarn in front, then work them at the beginning of the subsequent row, so there’s an easy-to-see-spot to pick up from.

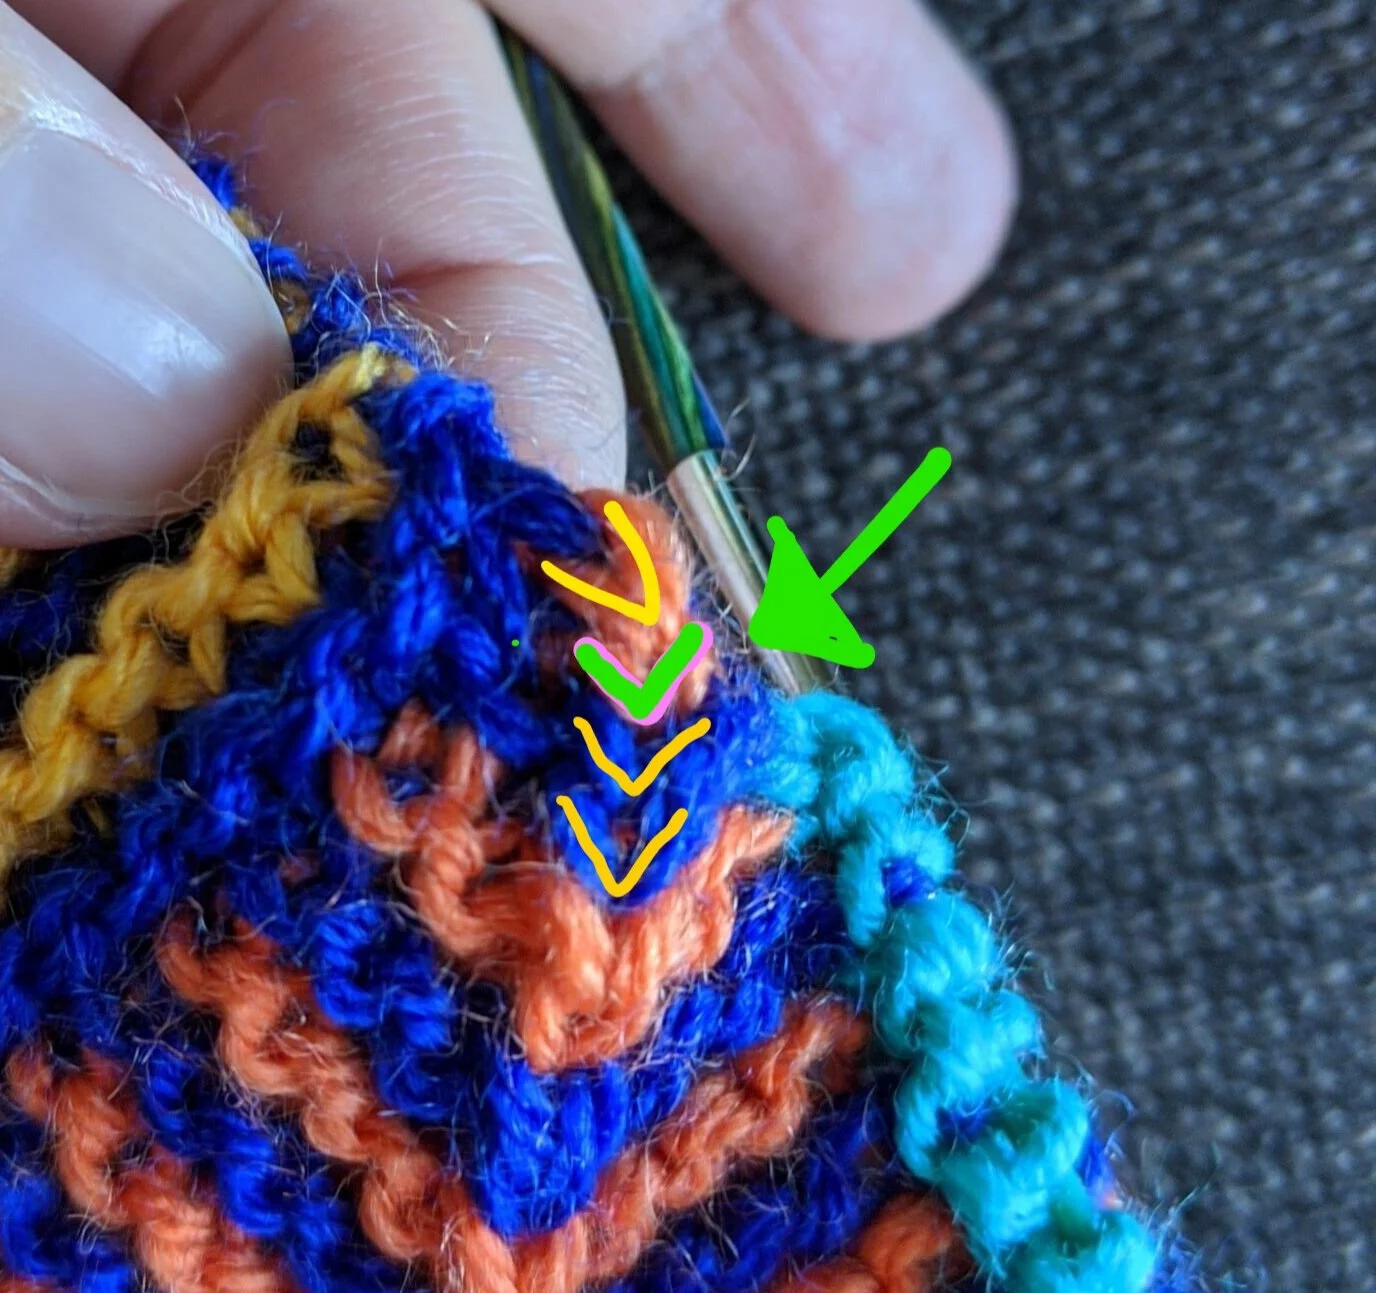
Close-up of corner of striped mitered square; the focus is a column of knit stitches (CDD stitches) alternating between 2 blue and 2 orange. The second-to-last orange stitch is the target for picking up stitches.

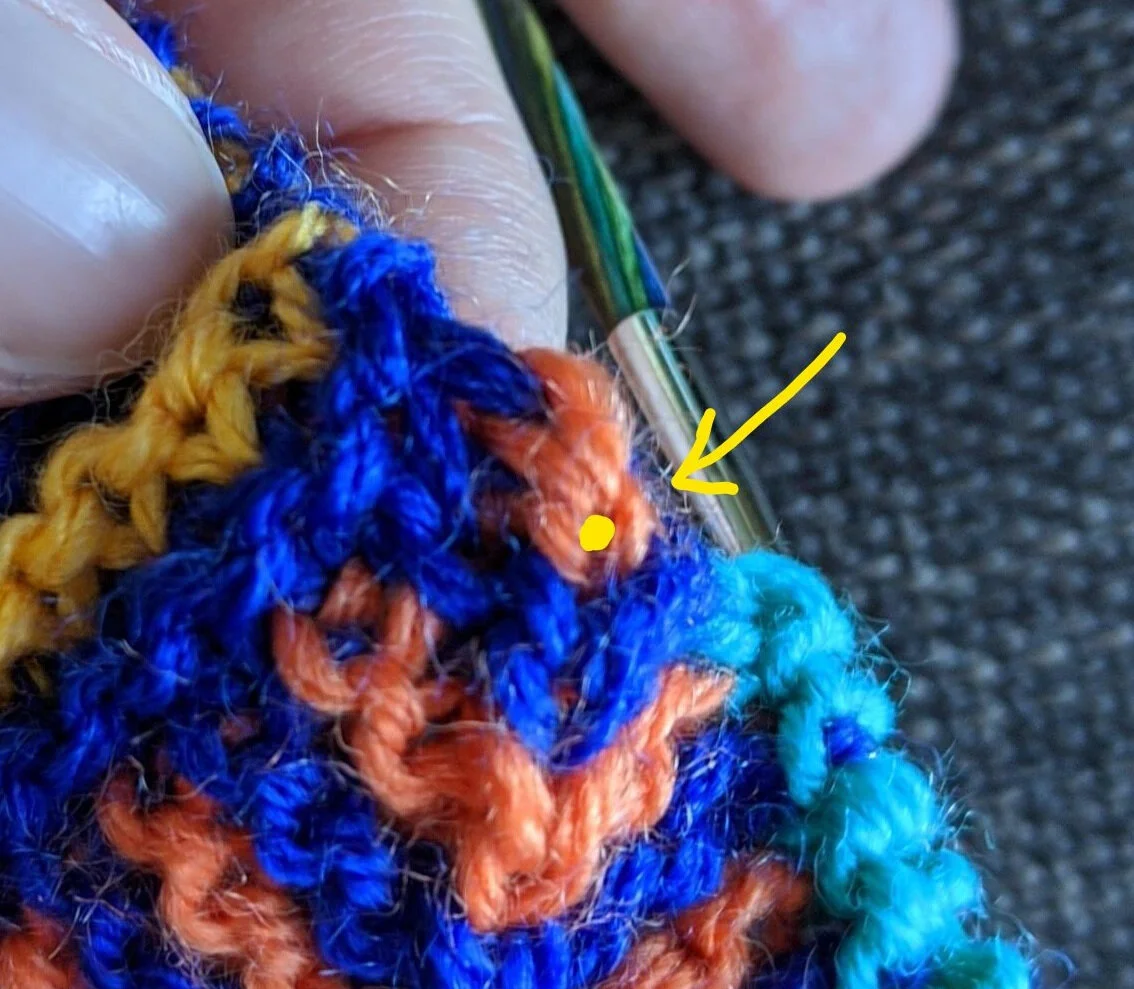
At the CDD stitch, you’ve likely used that final stitch as the first stitch for your next square, so the center spine is sort of pulled up and around. To avoid a curvy blip in the line of spine stitches, be sure to pick up the LOWER of the last 2 CDD stitches. And by this I mean, knit into the center of it, as if it were a knit stitch still on the needles.

Same photo as above, but the top 2 blue and orange knit stitches have been highlighted in yellow. The second-to-last orange stitch has a green arrow pointing to it.

A close-up of where to insert your needle when picking up this stitch:

The same image as above, but this time a yellow dot is in the center of the lower of the 2 orange stitches, indicating where to insert the needle when picking up the stitch.

Here’s what it looks like when everything is all nice and neatly picked up! You can see that it looks like the turquoise stitch grows out of the CDD used in the pickup. (You can also see a little bit of the final red stitch that was ignored peeking out from behind the turquoise stitch)

The same corner of the mitered square, this time with a row of turquoise stitches across the top, with a fresh column of CDD stitches growing seamlessly out of the one from the preceding square.
Close-up of another join between 2 mitered squares where the CDD line doesn’t continue neatly because I picked up the stitch in the last of the two orange stitches rather than the second-to-last.

For completeness, here’s a picture of a square I added where I picked up the last of the purple stitches, rather than the second-to-last, and it looks a little wonky. The last purple and the first turquoise both seem to slant awkwardly to the left, and the line of CDDs has a little zig. Ultimately it’s not a HUGE deal to me, but I feel like part of the delight of making things by hand is paying attention to the tiny details like this!

Learn to read CDDs and kiss your stitch markers goodbye!

I really love the stacked look of the centered double decrease (CDD), and when working crown decreases on a hat, I also like being able to combine the typical 2 decrease motions (k2tog and SSK usually) into 1 movement.

First, a refresher. The CDD is worked like so:

Slip next 2 sts together knit-wise. Knit 1. Pass 2 slipped sts over this stitch.

However, the nature of how CDDs are constructed means that, when you’ve placed markers indicating where the decrease should be worked, you can’t simply say “knit to 3 before marker, CDD, repeat,” as this would result in a weird diagonal. You have to place the stitch marker in the middle of the stitches that will be worked in the CDD. With a stitch marker involved, the CDD instructions would be more like:

Knit to 2 before marker. Slip next 2 sts together knit-wise. Remove marker. Knit 1. Pass 2 slipped sts over this stitch. Replace marker.

Kind of fiddly!

By learning to read the CDD stitch in your knitting, you can avoid the need for placing markers entirely, and live dangerously! This is how I knit the crown on my Little Bits Beanie, and I hope it helps you knit yours too.

Let’s look at some photos to get a sense of what’s happening. Unfortunately, there is no way to avoid the set-up round and the initial placing of markers to mark the sections of the crown of the hat, so you have to work that round. Here we are on the next round, knitting to 2 stitches before the marker. Keep in mind that the stitch just before the marker will always be the center stitch of the CDD.

Knit to 2 stitches before marker

Knit to 2 stitches before marker

Slip the next 2 sts knit-wise:

Slip the next 2 sts knit-wise

Slip the next 2 sts knit-wise

Remove marker and knit 1:

Remove marker and knit 1

Remove marker and knit 1

Pass 2 stitches over the just-knit stitch and replace marker after the CDD:

Pass 2 stitches over the just-knit stitch and replace marker after the CDD

Pass 2 stitches over the just-knit stitch and replace marker after the CDD

In the early stages of crown decreases, you’ll likely have a rest row in between decrease rows. So, here we come back to the CDD, having worked the rest row. We’re ready to work another decrease, so we stop 2 stitches before the marker again.

Ready to work CDD the second time

Ready to work CDD the second time

Let’s take a look at it without the marker:

2 stitches before the marker, but there’s no marker!

2 stitches before the marker, but there’s no marker!

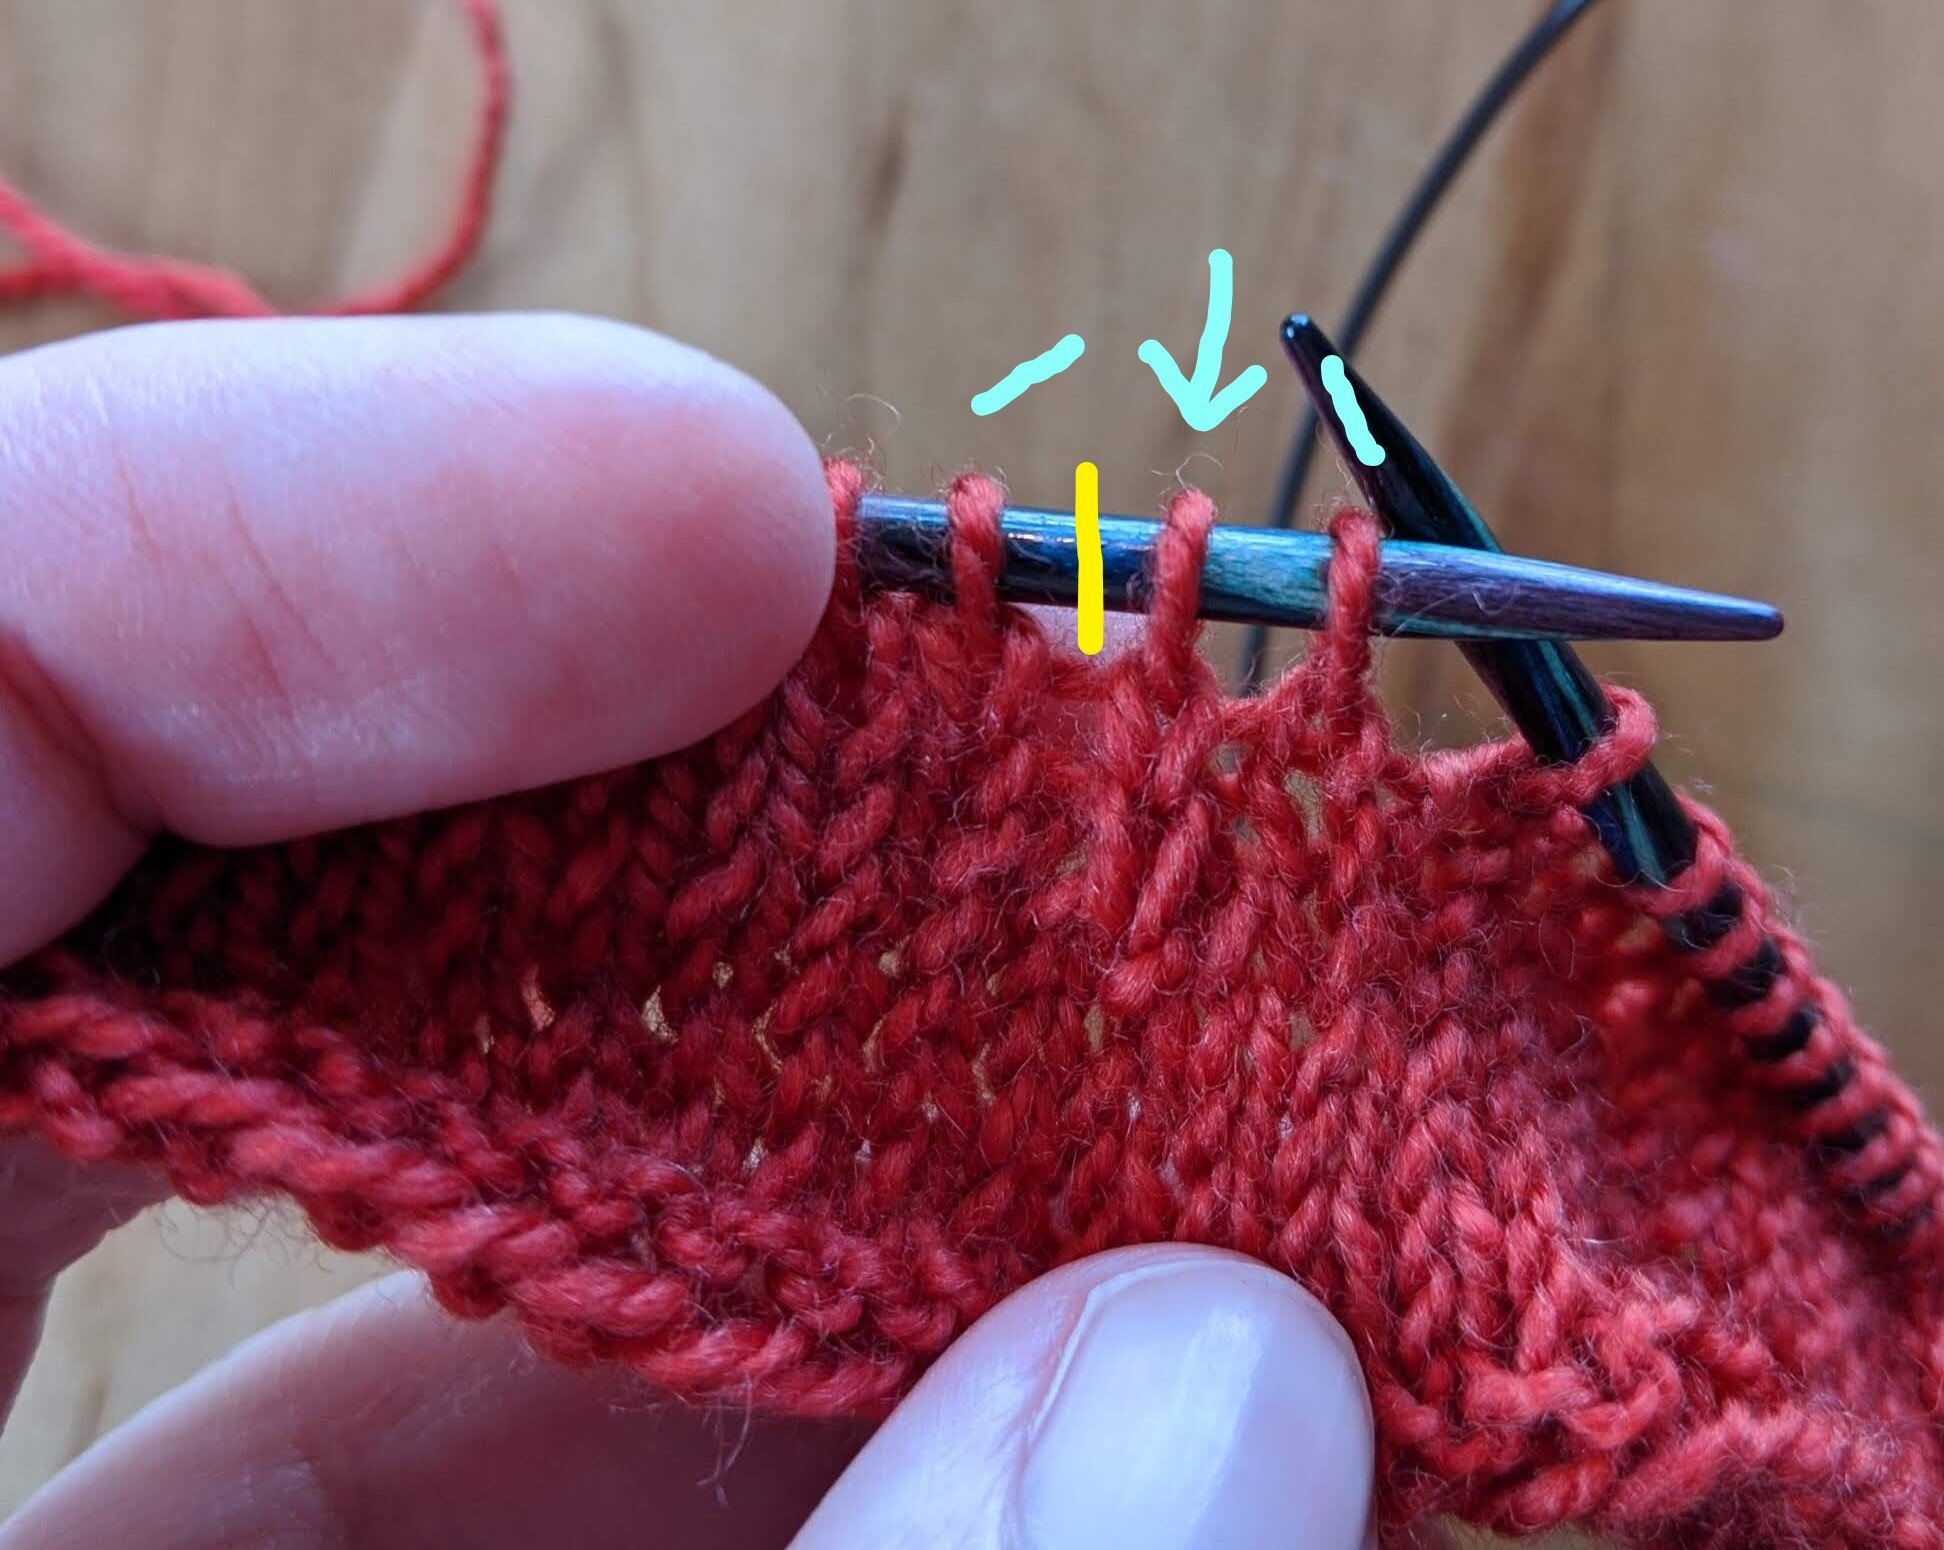
You can hopefully see the CDD stitch, which stands up above the surrounding stitches because it’s got 3 stitches all stacked on each other underneath. This column of stitches will always be the center of the 3 stitches involved in the CDD. Thus, if basing your counting off of this visual, you’d stop when you have 1 stitch + this CDD stitch, then begin the “slip 2 together knit-wise.”

The center stitch of the CDD is marked with an arrow, and the neighboring 2 stitches that will be decreased are marked with light blue lines. The yellow line is where the marker would be.

The center stitch of the CDD is marked with an arrow, and the neighboring 2 stitches that will be decreased are marked with light blue lines. The yellow line is where the marker would be.

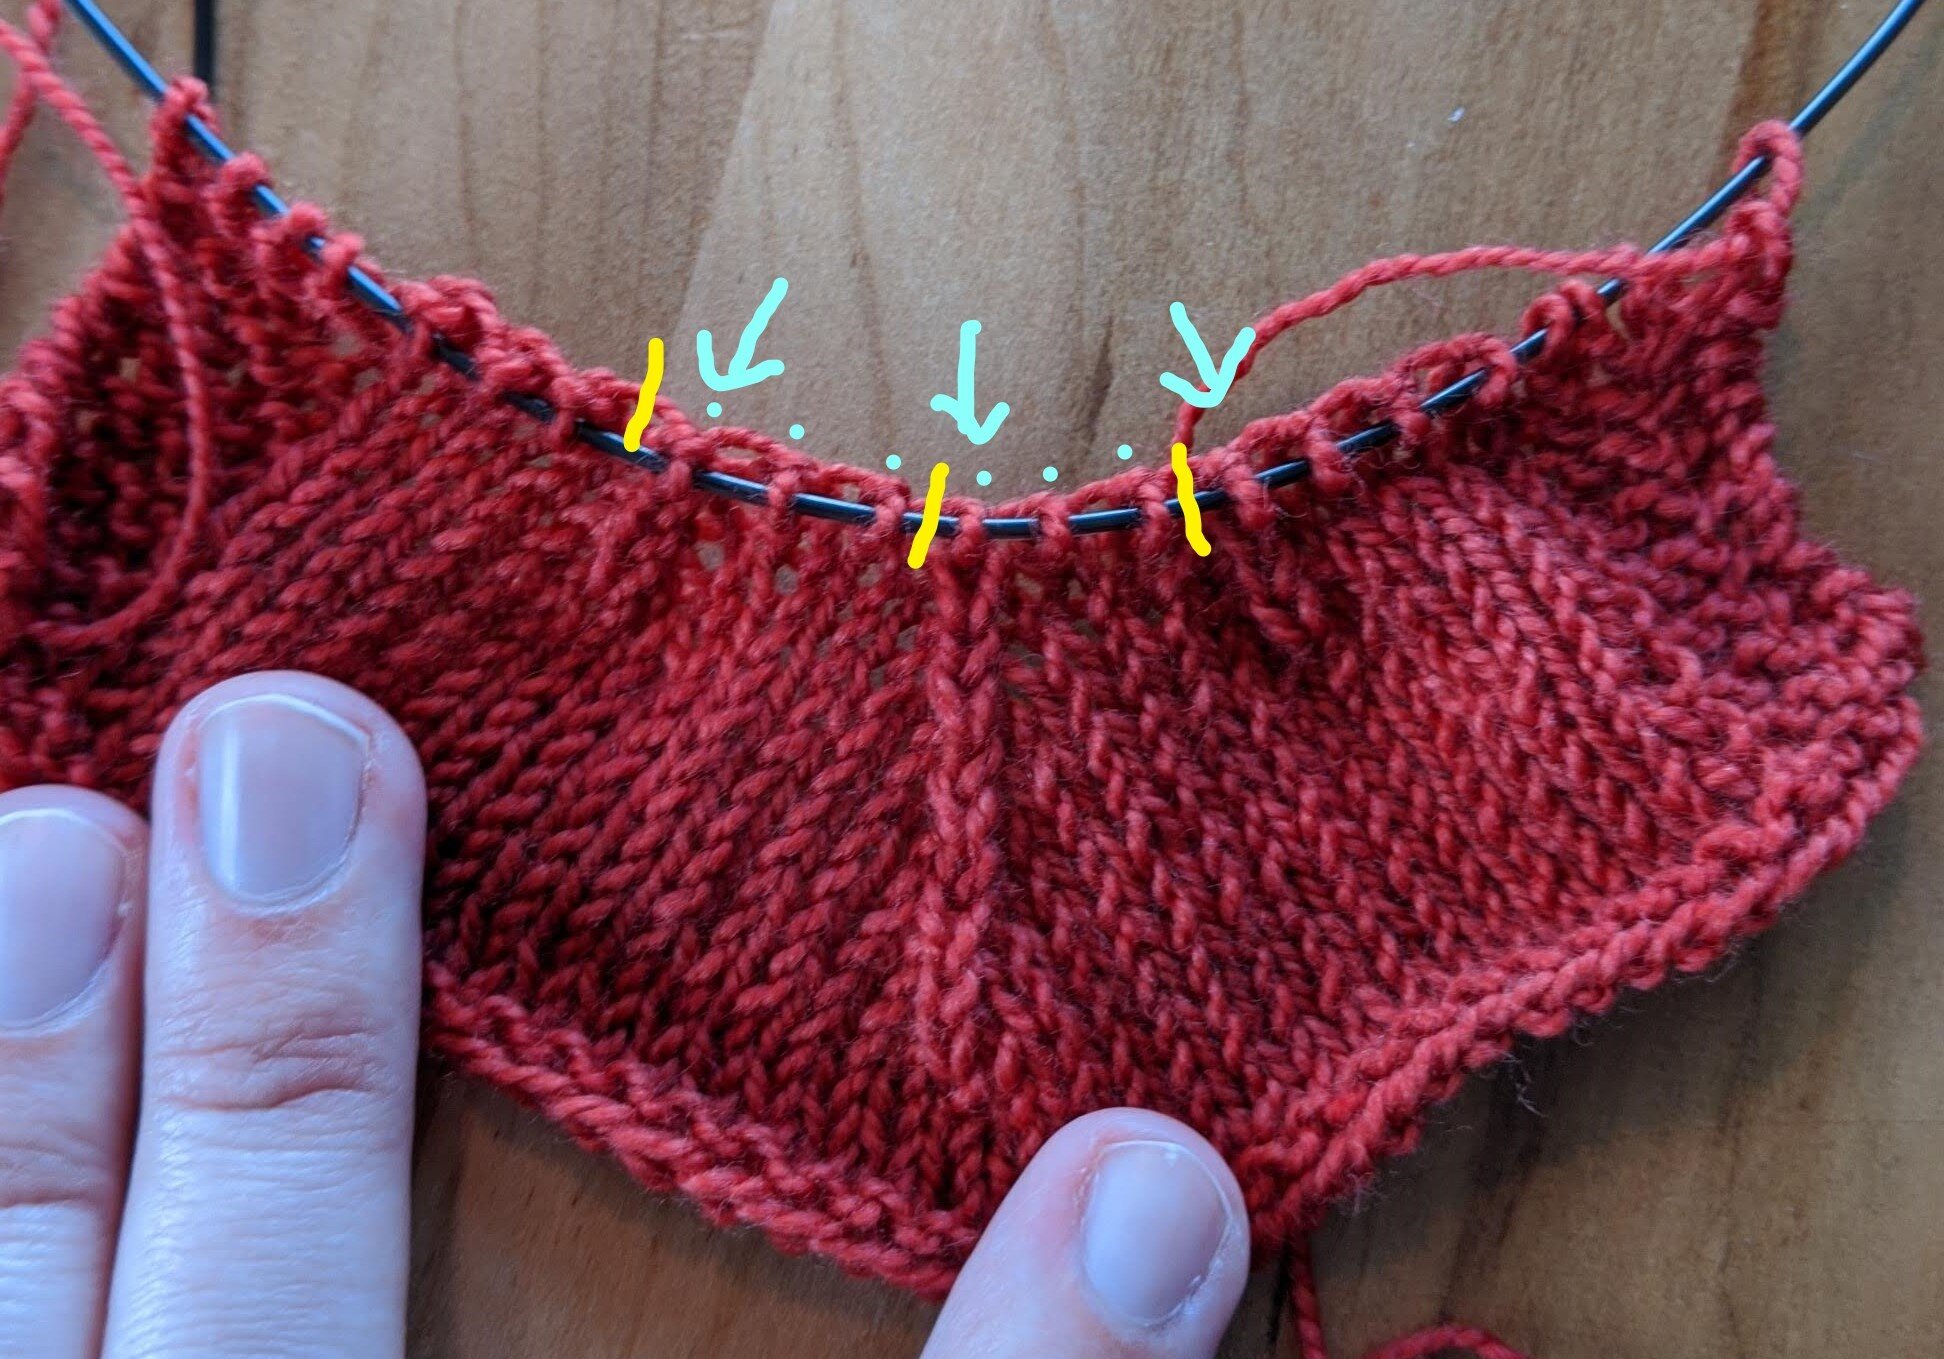
Here’s what it looks like once you have a stack of CDDs, including a few nearby as they slowly converge at the crown of the hat. Remember where the stitch markers are supposed to be with regard to the CDD stitch? Can you tell how many stitches there are “between markers”?

A stack of CDDs in the center with two CDDs converging on it to the right and left.

A stack of CDDs in the center with two CDDs converging on it to the right and left.

Here’s the same image, but with guidelines. The blue arrows indicate the 3 stacks of CDDs. The yellow lines indicate where the stitch markers would be. The blue dots show that there are three stitches between markers at this point. When counting stitches, count the stitches between the CDDs and include ONE of the CDDs in the count. In the case of the Little Bits Beanie, the CDD is at the end of each section, so you’d count from the BOR marker to the first CDD - that’s one section. Then, count from the stitch just after this first CDD to the next CDD, and so on, to ensure all sections have the same number of stitches.

8 multiple cdds guidelines_jpg.jpg

Hopefully this helps you ditch the stitch markers and work CDDs with reckless abandon! If you have any questions, or anything is unclear, please feel free to leave a comment below.