sock

Rogelio

Two feet modeling hand-knit socks in lavender yarn. A dainty lace motif repeats up the instep, and there’s a lacy ruffled cuff at the top.

Two feet modeling hand-knit socks in lavender yarn. A dainty lace motif repeats up the instep, and there’s a lacy ruffled cuff at the top.

Rogelio was one of the earliest Jane the Virgin-inspired socks that I had a clear concept of - given his flair for the dramatic, and the flowy shirts he wears as part of his role as Santos, it seemed only natural to give him something lacy and frilly to match his bold personality and over-the-top costumes!

For the lace pattern on the instep, I turned to my stitch dictionaries. I wanted something with a short-ish repeat, and the design I settled on is predictable enough that it’s not too hard to memorize either! The lace repeat itself is only 8 rounds, but it’s doubled by the addition of the lacy ribbing. The lacy ribbing is from one of the Japanese stitch dictionaries - I love it because it still functions like twisted rib, which is a lovely addition on its own, but adds a simple-yet-effective flair with the alternating lacy parts! During testing I realized the 16 round chart, complete with the ribbing columns for each sides, had been shrunk down a bit too much for some folks, so I added a page that just has that chart blown up as big as it will go. If you find yourself straining to see the instep chart, I hope that addition is useful to you!

The ruffle was the most challenging part for me, mostly because I’ve never knit one before! I’ll admit - my personal style is such that I just don’t wear ruffles. However, I feel like the concept really required it, so I learned a new skill! The ruffle design is an amalgamation of a few different ruffle designs I saw both on other socks and in stitch dictionaries, and is hopefully pretty straightforward to knit. That said - if you’re like me and don’t particularly want to knit a ruffle, the pattern tells you where to bind off after you’ve worked the ribbing.

Rogelio de la Vega saying “A hug from Rogelio is like a rabbit’s foot: lucky, rare, and soft to the touch.”

Rogelio de la Vega saying “A hug from Rogelio is like a rabbit’s foot: lucky, rare, and soft to the touch.”

For the color choice, though the rest of my JTV socks will be in either blue-teal-aqua or coral-pink-red to match the strong color themes of the show, for my man Rogelio I had to use lavender. After all, he doesn’t pop in peach!

Rogelio is available on all the platforms!

Payhip | Ravelry | Etsy | Lovecrafts

Cuff-down heel-flap sock recipe

Thanks to a random post in a sock knitting group on FB, I finally looked up the mathematical guidelines for a heel flap construction. I found that answer here (thank you very much Sara Morris Design!)

Of course, knowing the specific calculations, I couldn’t just leave it there, I had to make a spreadsheet! Having just finished the Sizing With Spreadsheets course from Swanky Emu Knits, rather than just plopping the heel calculations into a spreadsheet and calling it a day, I spent a few hours yesterday and today putting together a pattern from start to finish that incorporates the heel math. The spreadsheet is here.

Please note, in order to keep a clean base copy you can’t edit this sheet directly - you must go to File > Make a copy to save it for yourself.

Select your gauge and desired ease from the drop-down menus, then enter your leg and foot measurements in the fields below. After that, your personalized sock recipe will populate in the pattern text below! Gauge options range from fingering to DK/worsted, and both inches and centimeters are provided.

If you’re just interested in a free vanilla sock pattern, feel free to stop reading here!

If you’re interested in possibly creating your own spreadsheet, here’s a rundown of the math I used.

Cuff

Since this is a cuff-down sock, we’ll start with the circumference on the leg in inches or centimeters

Socks typically have negative ease, so now we need to decide how much negative ease. In my internet travels, I’ve seen 10% referenced a lot. I discovered that I personally prefer something closer to 20%. For the purposes of this spreadsheet, I decided to offer a range because WHY NOT but you can also stick with one if you’re doing a particular kind of design!

Negative ease = leg circ. * .1 (for 10%, replace with desired percentage)

We’ll use the leg circumference LESS negative ease to figure out how many stitches to cast on:

Cast-on circumference = leg circ. - negative ease

Now we need to know the gauge - this can be whatever works for your yarn weight. For ease of calculations, I used the same for both in & cm calculations - how many stitches do you get in either 1 in or 2.5 cm? This doesn’t have to be a whole number, either, because we’ll take care of that next.

Number of stitches to cast on = (cast-on circ. * gauge) rounded to a whole number

For reasons that will become important later, I actually recommend rounding this to a multiple of 4.

Divide this number in half - that’s the stitch count for the front/back of the leg and will be used in the heel and toe.

After this, knit your cuff and leg as desired, then move onto the heel!

Heel flap

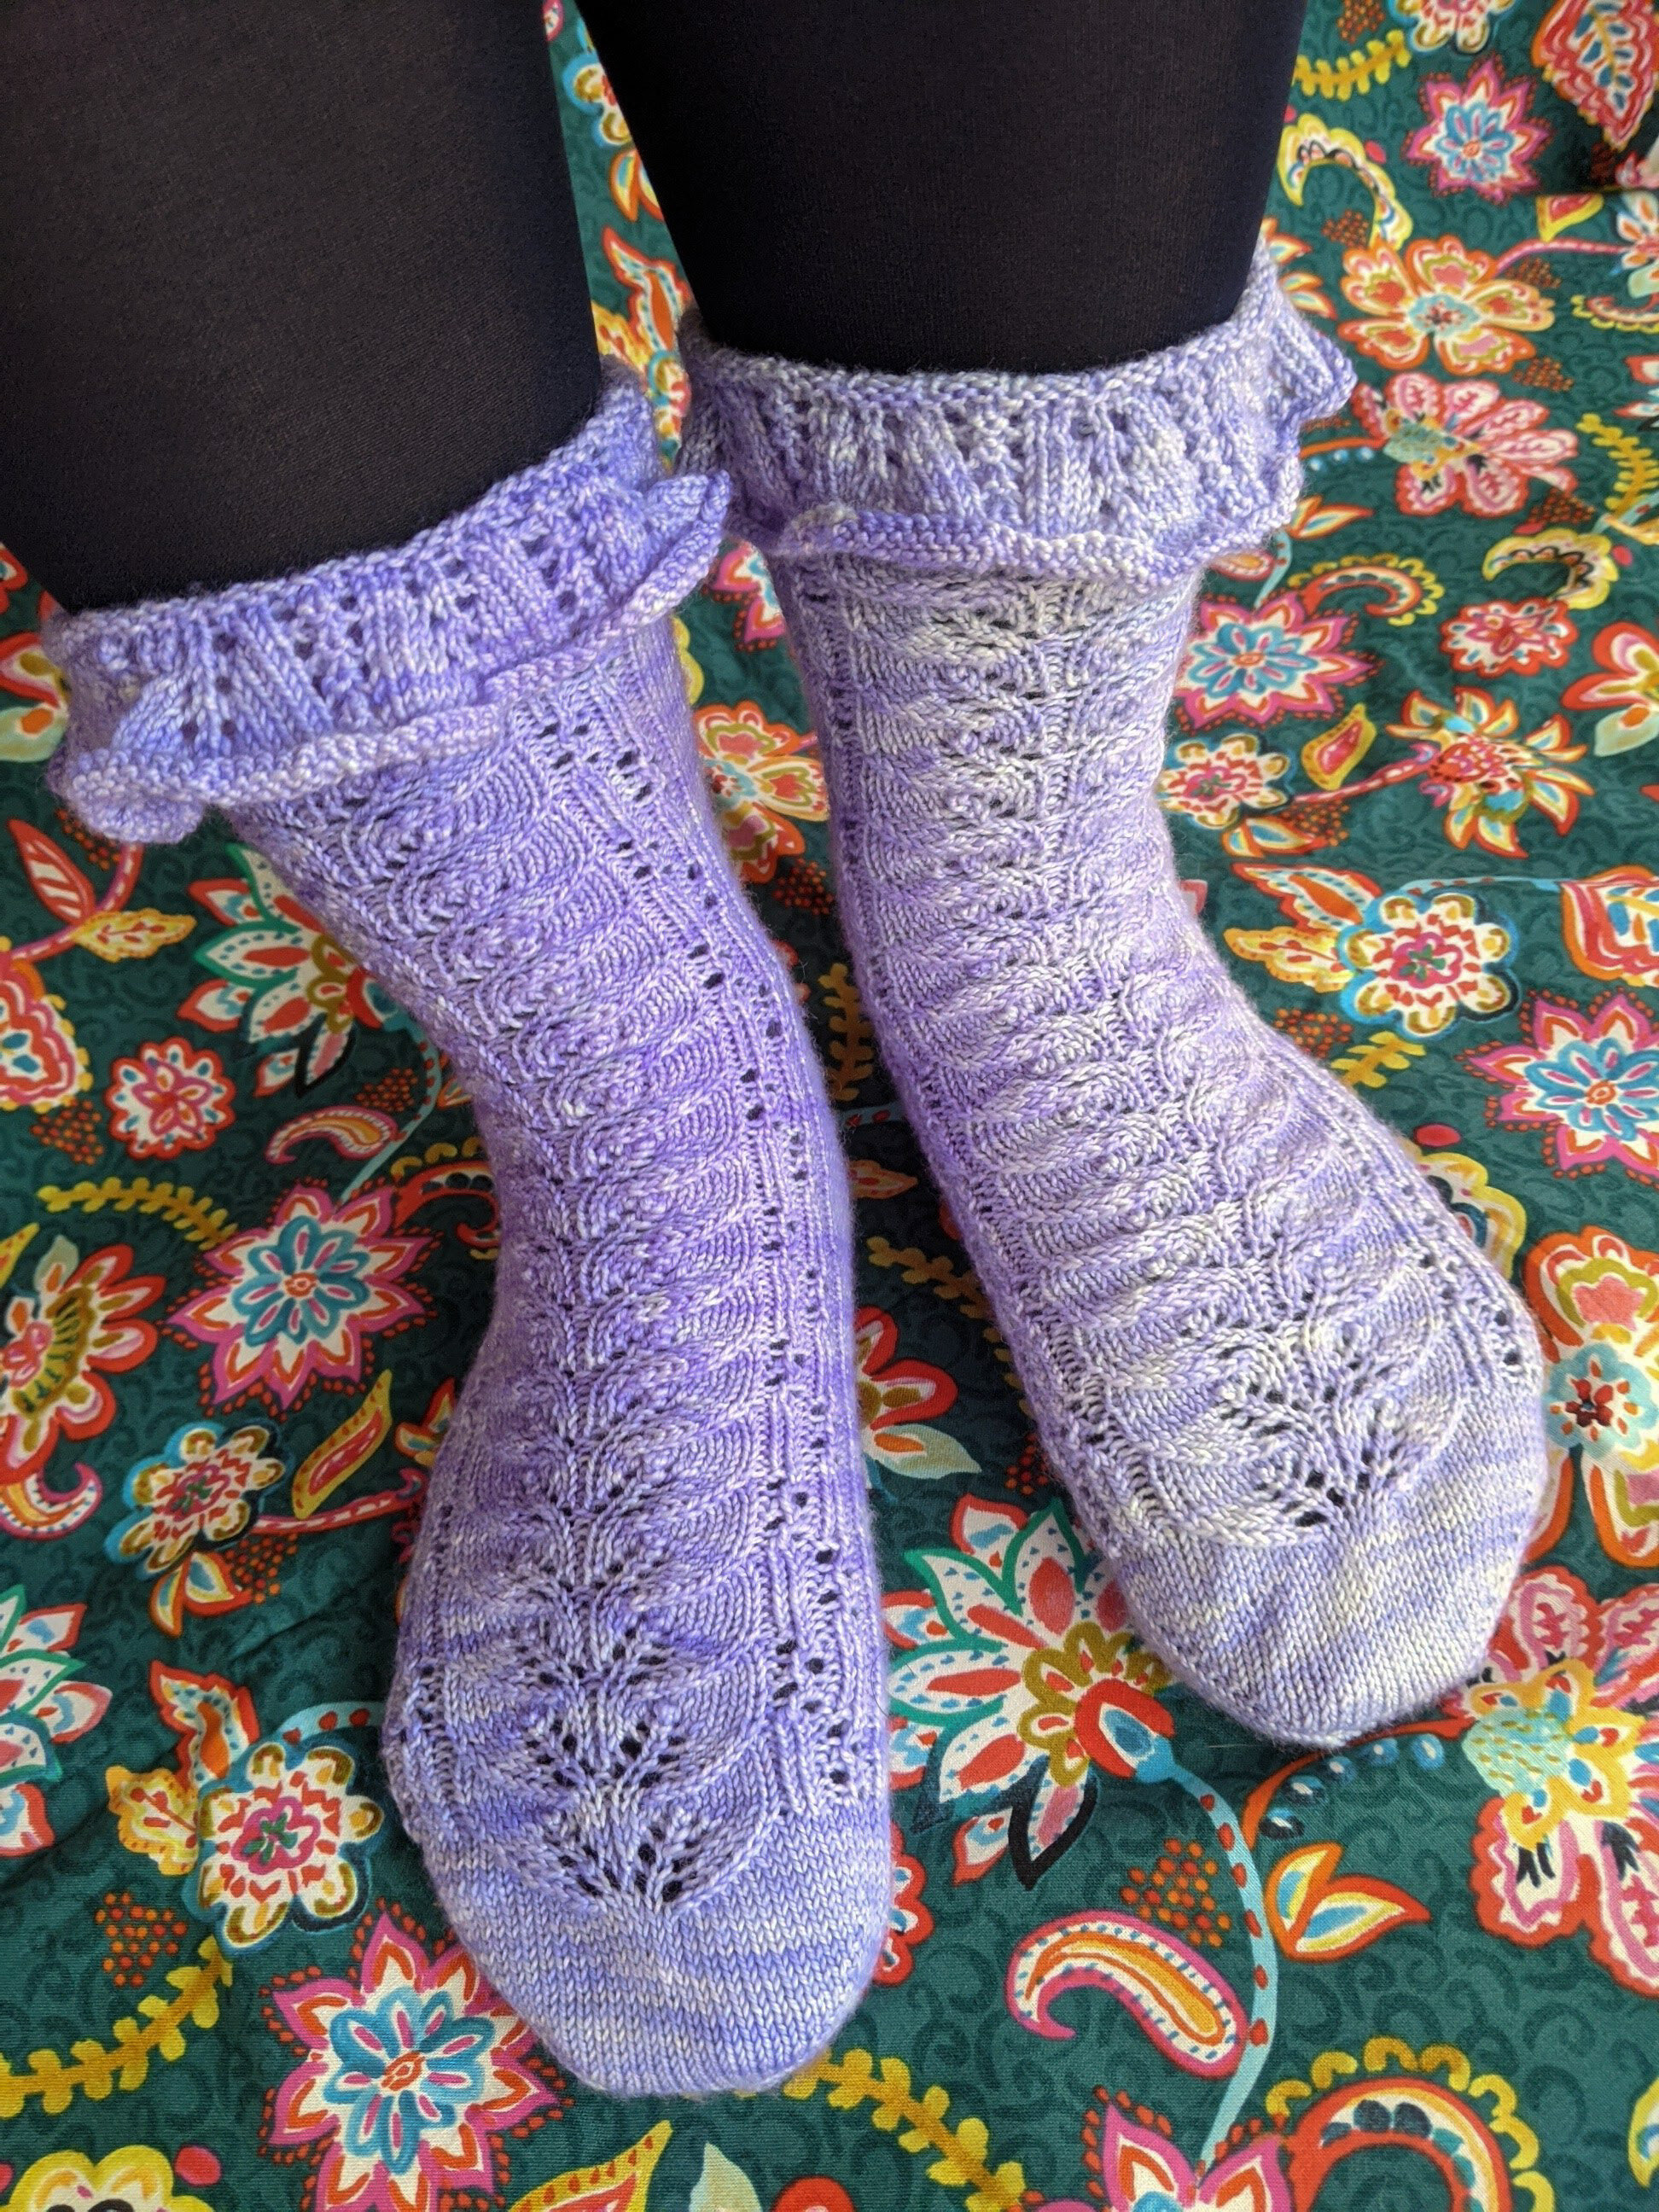
The heel flap can be whatever style you want (though usually something with more thickness like slipped stitches or garter is recommended since stockinette could wear through more quickly).

Most places I’ve referenced have said that the number of rows in the heel flap should equal half of the cast-on count. (So I guess that would mean the rule is (half of your leg circ. - neg ease)?) I’ve found that slip-stitch heels feel pretty short when I only work half the cast-on amount in rows, so this won’t work for me.

At some point during Sock Madness, I saw a comment that said to knit to the length of your thumb on the heel flap. Since starting to do that, I’ve found my heel flaps have been sufficiently deep, so I’m using it! Of course, if you have a better measurement to base the heel flap on, I’m all ears! Let me know if comments.

On the heel flap, knit an even number of rows and end after a purl row.

This is where I thank Sara Morris Designs for her blog post of wisdom.

Heel flaps generally have a flat portion around which the decreases occur - the blog post recommended 10% of the total cast-on count, and to round down. (There’s another bit about whether to make this number even or odd to match half of your stitch count, but I can’t figure out how to express that in calculations yet so I’m skipping it.)

Center of heel flap = (Total cast-on * .1) rounded down to the nearest whole number

The decreases need to be centered on the heel, so now we figure out how to approach that first heel turn row:

(Center of heel flap + half stitch count) / 2

You’ll knit that many, ssk, k1, and turn.

How many to purl back = Center of heel flap + 1

Purl that many, p2tog, p1, turn.

And continue until all heel stitches are worked!
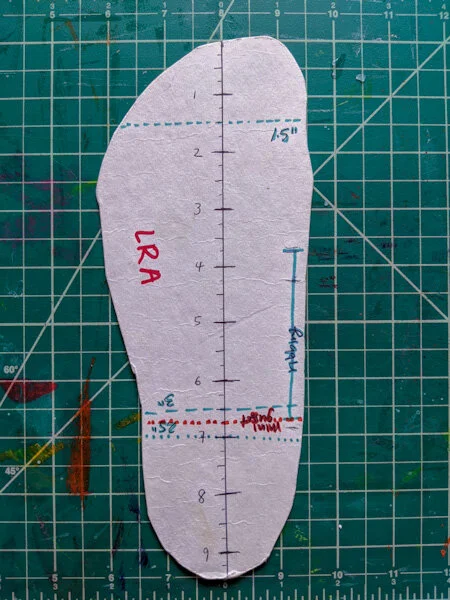
Gusset

How many stitches to pick up on each side of heel flap = Rows in heel flap / 2

You’ll probably also want 1 or 2 in the gap where you resume working across the instep!

Decrease every other round until you get to your foot circumference - the circumference around the ball of your foot.

Foot circumference is calculated the same way as the calf - Subtract your desired negative ease from the total measurement, then multiply by the stitch gauge.

Toe

For a wedge toe, I aim to decrease to 2/3 of the total stitches doing increases every other round, then to 1/3 of the total stitches every round. To figure out how long the toe will be (and thus where you need to start it…)

Rounds for every-other-round decreases = total stitches - 2/3 total stitches

Rounds for every-round-decreases = (2/3 stitches - 1/3 stitches) / 2

Add up for the total number of rounds, then divide by your round gauge. That’s how long the toe will take, so subtracting it from your total foot length will tell you where to start!

Black Flame Candle is here!

Two hand-knit socks in orange and black stripes. Slipped stitches on the instep create a motif that looks like candle flames moving up the leg.

A bit late, but I couldn’t not talk about the creation of Black Flame Candle, my contribution to the 2020 Super Sock Scarefest knitalong (Ravelry link). The general theme of the Scarefest is that all sock patterns are inspired by scary movies. Of course, what constitutes a scary movie varies depending on who you ask! That’s why this year I went with our household favorite Hocus Pocus. I knew I wanted something that would hopefully be immediately recognizable to the film, but I couldn’t come up with anything for the human characters. The next most memorable element, for me (besides the cat), is the ~Black Flame Candle~ that sets the whole series of events in motion.

At first I tried to find a decent picture of the candle itself - it seems to have lots of writing on it, and I thought maybe I could design a colorwork pattern that resembled the candle itself. Unfortunately, the movie is old and there are few enough closeups of the candle that this proved impossible. There are some really enterprising individuals out there who have made their own versions, though, should you need to decorate a candle for your own home!

A grainy screen cap from Hocus Pocus showing the Black Flame Candle, ominously lit.

From there, I decided to focus on the flame itself. I started looking up stitch patterns that resemble flames (or leaves; frankly they often look interchangeable to me) and finally settled on the one I used in this pattern. In its original state, it was single color (and the written instructions had all the knits as “k” instead of “ktbl” even though based on the reference image, they were clearly “ktbl”!), so I spent a long time swatching with two colors to figure out if I could make it mosaic. I really wanted that bright outline so the flame would look like the one in the movie - dark in the center, with the white-hot outline to show you it was burning. As important as swatching is, I still don’t like doing it, so my swatch was only 20 stitches on each side and about 4 inches long since I worked the pattern a few different times.

After I had the flame motif worked out, I had to figure out how to make it work on the sock itself. Since it involves an “intro” and “outro” section where the stitch count is less than the main repeat of the pattern, I had to figure out how to handle the making the sock fit the same circumference of leg in those sections. Hopefully I hit on the right balance of increases and decreases - I didn’t get too many questions about it during the KAL so I think so?

The great thing about having this pattern be part of a KAL is there are so many projects to browse to see all the different color combo ideas folks had! If Ravelry is safe to use for you, I hope you’ll check out the different takes each knitter had.

You can get the pattern from any of the links below!

Chocobo Racer is here!

After much teasing regarding the colorway and inspiration for this pattern, the day has finally come!

Two feet wearing handknit socks in warm yellow yarn with brown and orange speckles. A lace pattern that looks like feathers rings the cuff, and a different lace pattern wanders down the outside instep of each foot.

Chocobo Racer, inspired by chocobos from Final Fantasy and shown in the lovely color “Golden Chocobo” from Shipyarn, is now available on Ravelry and Payhip. I’ve also created a Low Vision Attribute version based on the guidelines from the Accessible Patterns group on Ravelry. That version has 24 point black sans-serif font (Arial), 1” margins, and only the written instructions for the charts.

You can also get one of a limited number of kits, which include a skein of yarn in the Golden Chocobo colorway and a copy of the pattern, from Shipyarn’s shop.

This pattern was a collaboration project with V, the mastermind behind the fandom-inspired colorways at Shipyarn. She wanted to expand her yarn base selection to include a fingering weight yarn, and I not-so-subtly insisted that it should be appropriate for socks. Because socks.

The same lacy socks on blue sock blockers, displayed on a wood floor, with a skein of the yellow yarn in a swirl next to them.

We tested a few different options, and ultimately she went with a 100% polwarth base. I feel like I only recently heard about/came into contact with polwarth, so if you’re also new to it then you should know that it’s actually a variation from merino, and was developed to be hardier while still maintaining softness. Shipyarn’s polwarth base isn’t as soft as a merino/nylon blend at first blush, but it softens with wear and washing AND has great stitch definition and sturdiness. 5/5 would recommend!

Since the inspiration was the majestic chocobo, I felt the pattern needed some kind of avian flair. The lace on the cuff looks like a ring of feathers, which is delightful, but my absolute favorite part of the design is the lace panel that traipses down the leg. The intermittent and constantly-moving clusters of yarnovers make me think of footprints (or bird tracks) in sand, as if a very indecisive bird scuttled this way and that, trying to figure out which way to go. With that mental image, I knit the sample very quickly!

Get this pattern from Ravelry or Payhip with the buttons below. As with all my patterns, it will be offered at 15% off for 1 week after release.

Make a helper foot for socks

How do you measure socks when knitting? I’ve seen lots of tutorials that involve simply putting on the sock WIP and measuring it against your actual foot and I’ve seen lots of photos of very nice “sock rulers” that can be bought but not necessarily customized to your actual foot.

I typically take my knitting with me on my commute, so pulling off my shoes in order to try on an in-progress sock is not an option for me. Instead of buying a generic sock ruler, I decided to make one exactly customized for me:

You’ll need:

  • sturdy cardboard or posterboard

  • a pen or marker

  • a helpful friend or decent flexibility

  • an actual ruler

  • scissors

Close-up of the heel part of the cardboard foot. Two dashed lines indicate 3” and 2.5” away from the end of the heel. A line at 2.75” is labeled “mini gusset.”

Now you can pull out your “foot” wherever you are and get a quick measurement! This works for both toe-up and cuff-down patterns, and also makes it easy to see the stitch pattern stretched out like it would be across the instep. If you make them for folks you frequently knit socks for, don’t forget to label them!

Do you have a foolproof method for measuring your socks? Tell me about it on comments!

A cardboard cutout of a foot placed next to a ruler. The ruler is being used to add measurement marks to the cardboard.

The steps:

First, place your dominant foot on the cardboard and put weight on it. Have a friend trace the shape of your foot onto the cardboard. Cut out the foot shape (it’s fine and probably preferable to make the toes rounded like a mitten rather than have a scalloped edge).

Take your ruler and draw a line down the center (long-ways, from toe to heel), then add in ruler measurements. I went ahead and added notations for measurements I typically see in sock patterns, such as where to begin a fleegle/strong heel gusset, mini-gusset, short-row heel, or toe decreases. (Your specifics may vary - use whatever makes sense for the size of your foot and the types of sock patterns you normally knit!) I also added a measurement for ribbing on the arch of my foot. If you have modifications you find yourself making time after time, throw them on there!

Close-up of the toe of the cardboard foot. A dashed line indicates 1.5” from the end of the toe.
The finished helper foot displayed on a green lined backdrop. In addition to the measurement lines on the heel and toe, there’s a vertical line at the arch of the foot labeled “ribbing” and the letters “LRA” written along the blade of the foot.

Alba sock is here!

alba 1.jpg

Alba is next on my sock tour through the wonderful characters of Jane the Virgin. She took time to grow on me, given that her role in the first season was to encourage Jane (and, through flashbacks, Xiomara) to give birth to children they might not have wanted at the time. Of course, a show this woke and nuanced wouldn’t leave her a one-dimensional character, and as she grew on me her continued arguments just gave other characters in the show the chance to argue the opposite side of the issue, so it all worked out!

For this pattern, I thought of what kind of socks Alba might like to wear. Something sturdy and comfortable - hence the princess sole and EOP heel - with just a little bit of fun. Once I knew I wanted to do a princess sole, I knew I’d need a pattern worked on a field of purls so there wouldn’t be an abrupt change between the sole and instep of the sock. I also knew that I didn’t actually want to do all that purling.

I settled on a pattern that uses a “long stitch;” except, if you google instructions for “long stitch” you’ll get something different from what my stitch dictionary says. To further complicate matters, I flipped the pattern around, so you’re actually doing a “purl long stitch.” Not to worry, though! It’s not a difficult stitch to work, even purling it, and I have a photo tutorial in the pattern since I couldn’t find any existing source to link to.

albachar.png

The heel flap took some noodling to get it to look right, since I had to think about everything backwards in order to get the pillow-y textured side you’re accustomed to facing out once the knitting was done and the socks were turned right side out. My prototype sock experienced a LOT of ripping and reknitting!

I should also say that the original sample I made was in the color I’d really like to have used for the pattern photos - a deep teal reminiscent of Alba’s dressier outfits (Knit Picks Stroll Tweed - Marine Heather). But, it’s nearly impossible to get nice photos of dark yarn during a dark Seattle winter (plus, I made some mistakes on the leg of that sock…) so I ended up reknitting the pattern in a lighter yarn (Miss Babs Hot Shot - Ocean Breeze) so I could get photos more easily. At least I could get some deep stash on the needles!

Alba is 15% off, no code needed, for one week! Subscribers to my mailing list get a code for 30% off - scroll down to subscribe.

Xiomara sock is here!

I’ve been looking forward to this announcement for months! If you’ve never seen the show Jane the Virgin, first, you gotta check it out. (I watched it on Netflix.)

xo orange top.JPG

Not only is the show itself great, combining high-drama telenovela plot points with extremely relevant and social commentary, but the color palette is to die for (to dye for??). Every episode is a feast for the eyes with bright corals and oranges contrasted beautifully against a range of teals and blues.

I couldn’t stop thinking about all the different colors, and my natural inclination when trying to translate some inspiration into knitting design is to go to a sock pattern! Thus, the Jane the Virgin sock series was born.

xo_1_medium2.jpg

The first sock in the series is inspired by Xiomara. She wears a lot of bright colors and geometric patterns and is no stranger to flirty dresses. I figured a sock design inspired by her would be in a loud color and have plenty of bling. It needed to be something as fun as her personality!

I went stash-diving and came up with some Scientific Sock from NanoStitch Labs in the red-orange colorway Rachel Carson. Thanks to a bead-buying blitz last year in preparation for Sock Madness, I already had some shiny silver seed beads on hand. I had originally planned to include a LOT more beads in the texture pattern on the instep, but had to abandon that idea when I realized…I love the look of beads don’t like beading that much! Thus, the beaded cuff was born. Once you get those beads done and out of the way, it’s just cables that flow into a point and some easy texture in between.

It’s important to me to provide both charts and written instructions, but as it turns out, having all those charts created a LOT of written text! With that in mind, please don’t panic when you see the page count on this pattern. I usually print my knitting patterns out so I can carry them around with me, and I have Opinions about what type of patterns are easiest to print, so I collected the written instructions for each size into their own sections rather than mixing them all together. Hopefully that makes it easier to decide which pages to print and saves you paper and ink.

Because of the many charts, adjusting the size of this pattern would be more complicated than simply adding X number of stitches for an additional repeat, so I created a spreadsheet that should do the math for you! It has the option of adding calf decreases should you need it. I created it in Google Sheets and tried to protect all of the cells except for the ones you need to enter your information in the hopes of avoiding any accidental editing. (As it turns out, you can’t upload Excel files to Ravelry.) I learned a lot about the limitations of Excel and Sheets this week.

Xiomara is 15% off for its first week, no code needed! If you’d like to find out about the rest of the socks in this series and get subscriber-only discounts, please join my mailing list.