Blog — lauroftheblings designs

Chocobo Racer is here!

After much teasing regarding the colorway and inspiration for this pattern, the day has finally come!

Two feet wearing handknit socks in warm yellow yarn with brown and orange speckles. A lace pattern that looks like feathers rings the cuff, and a different lace pattern wanders down the outside instep of each foot.

Chocobo Racer, inspired by chocobos from Final Fantasy and shown in the lovely color “Golden Chocobo” from Shipyarn, is now available on Ravelry and Payhip. I’ve also created a Low Vision Attribute version based on the guidelines from the Accessible Patterns group on Ravelry. That version has 24 point black sans-serif font (Arial), 1” margins, and only the written instructions for the charts.

You can also get one of a limited number of kits, which include a skein of yarn in the Golden Chocobo colorway and a copy of the pattern, from Shipyarn’s shop.

This pattern was a collaboration project with V, the mastermind behind the fandom-inspired colorways at Shipyarn. She wanted to expand her yarn base selection to include a fingering weight yarn, and I not-so-subtly insisted that it should be appropriate for socks. Because socks.

The same lacy socks on blue sock blockers, displayed on a wood floor, with a skein of the yellow yarn in a swirl next to them.

We tested a few different options, and ultimately she went with a 100% polwarth base. I feel like I only recently heard about/came into contact with polwarth, so if you’re also new to it then you should know that it’s actually a variation from merino, and was developed to be hardier while still maintaining softness. Shipyarn’s polwarth base isn’t as soft as a merino/nylon blend at first blush, but it softens with wear and washing AND has great stitch definition and sturdiness. 5/5 would recommend!

Since the inspiration was the majestic chocobo, I felt the pattern needed some kind of avian flair. The lace on the cuff looks like a ring of feathers, which is delightful, but my absolute favorite part of the design is the lace panel that traipses down the leg. The intermittent and constantly-moving clusters of yarnovers make me think of footprints (or bird tracks) in sand, as if a very indecisive bird scuttled this way and that, trying to figure out which way to go. With that mental image, I knit the sample very quickly!

Get this pattern from Ravelry or Payhip with the buttons below. As with all my patterns, it will be offered at 15% off for 1 week after release.

Make a helper foot for socks

How do you measure socks when knitting? I’ve seen lots of tutorials that involve simply putting on the sock WIP and measuring it against your actual foot and I’ve seen lots of photos of very nice “sock rulers” that can be bought but not necessarily customized to your actual foot.

I typically take my knitting with me on my commute, so pulling off my shoes in order to try on an in-progress sock is not an option for me. Instead of buying a generic sock ruler, I decided to make one exactly customized for me:

You’ll need:

  • sturdy cardboard or posterboard

  • a pen or marker

  • a helpful friend or decent flexibility

  • an actual ruler

  • scissors

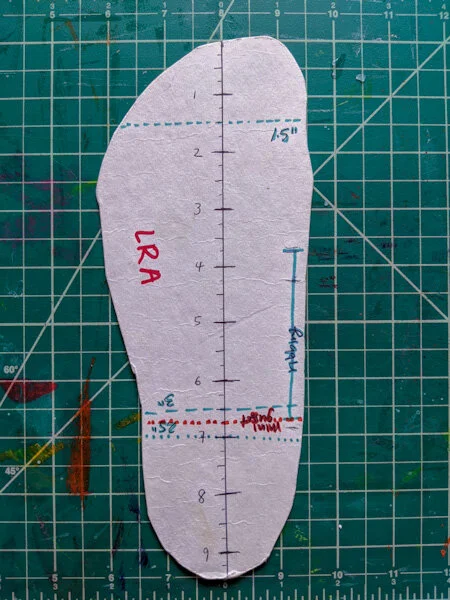
Close-up of the heel part of the cardboard foot. Two dashed lines indicate 3” and 2.5” away from the end of the heel. A line at 2.75” is labeled “mini gusset.”

Now you can pull out your “foot” wherever you are and get a quick measurement! This works for both toe-up and cuff-down patterns, and also makes it easy to see the stitch pattern stretched out like it would be across the instep. If you make them for folks you frequently knit socks for, don’t forget to label them!

Do you have a foolproof method for measuring your socks? Tell me about it on comments!

A cardboard cutout of a foot placed next to a ruler. The ruler is being used to add measurement marks to the cardboard.

The steps:

First, place your dominant foot on the cardboard and put weight on it. Have a friend trace the shape of your foot onto the cardboard. Cut out the foot shape (it’s fine and probably preferable to make the toes rounded like a mitten rather than have a scalloped edge).

Take your ruler and draw a line down the center (long-ways, from toe to heel), then add in ruler measurements. I went ahead and added notations for measurements I typically see in sock patterns, such as where to begin a fleegle/strong heel gusset, mini-gusset, short-row heel, or toe decreases. (Your specifics may vary - use whatever makes sense for the size of your foot and the types of sock patterns you normally knit!) I also added a measurement for ribbing on the arch of my foot. If you have modifications you find yourself making time after time, throw them on there!

Close-up of the toe of the cardboard foot. A dashed line indicates 1.5” from the end of the toe.
The finished helper foot displayed on a green lined backdrop. In addition to the measurement lines on the heel and toe, there’s a vertical line at the arch of the foot labeled “ribbing” and the letters “LRA” written along the blade of the foot.