The Wheel of the Year is here!

A circular shawl, made up of 8 sections in different variegated yarns, displayed on a log in the forest

In the last few years, Knitted Wit began to release seasonal holiday colors that line up with the solstices/equinoxes and the cross-quarter days that occur between them as part of their “Witch in a Box” line. For some reason, I decided to get these in DK weight instead of fingering, which is my go-to (as you might imagine from all the socks). Then, the 8 skeins marinated in my stash for many months while I noodled on how to best get them all into a single project. Originally I thought about doing some kind of mega-cardigan and striping the colors together, but ultimately I wanted each color to get to shine on its own.

Thus, the shlanket was born! I considered working it horizontally, but that would mean another provisional cast-on (which I LOVE and will never give up, but both of the other 2 designs in the Marking Time collection use it and I just wanted to take a break), and it would make stitch patterns tricky to fit into the short rows. Instead, I decided to work the sections of the shawl like pie slices, from the pointy end to the crust. Yum.

In order to get a good size shawl, I just kept knitting until I had about 30 inches of shawl - my initial attempt stopped at about 24 inches and just wasn’t a satisfying half-pi shawl size. But, working that much length meant I needed a lot of rows, and I get bored easily. Thus, each section in between the increase rows has a new stitch pattern to look forward to, just for interesting knitting!

Connecting each section isn’t as bad as you think - it’s a simple matter of picking up stitches along the edge of the previous section! The last section that joins to the very first one and creates the whole circular shawl is a bit fiddly in the first few rows, but it’s worth it if you want a big, snuggly blanket! Of course, if that’s not your deal you can always stop after 4 (or 5, or 6…)

Try it for yourself here:

Black Flame Candle is here!

Two hand-knit socks in orange and black stripes. Slipped stitches on the instep create a motif that looks like candle flames moving up the leg.

A bit late, but I couldn’t not talk about the creation of Black Flame Candle, my contribution to the 2020 Super Sock Scarefest knitalong (Ravelry link). The general theme of the Scarefest is that all sock patterns are inspired by scary movies. Of course, what constitutes a scary movie varies depending on who you ask! That’s why this year I went with our household favorite Hocus Pocus. I knew I wanted something that would hopefully be immediately recognizable to the film, but I couldn’t come up with anything for the human characters. The next most memorable element, for me (besides the cat), is the ~Black Flame Candle~ that sets the whole series of events in motion.

At first I tried to find a decent picture of the candle itself - it seems to have lots of writing on it, and I thought maybe I could design a colorwork pattern that resembled the candle itself. Unfortunately, the movie is old and there are few enough closeups of the candle that this proved impossible. There are some really enterprising individuals out there who have made their own versions, though, should you need to decorate a candle for your own home!

A grainy screen cap from Hocus Pocus showing the Black Flame Candle, ominously lit.

From there, I decided to focus on the flame itself. I started looking up stitch patterns that resemble flames (or leaves; frankly they often look interchangeable to me) and finally settled on the one I used in this pattern. In its original state, it was single color (and the written instructions had all the knits as “k” instead of “ktbl” even though based on the reference image, they were clearly “ktbl”!), so I spent a long time swatching with two colors to figure out if I could make it mosaic. I really wanted that bright outline so the flame would look like the one in the movie - dark in the center, with the white-hot outline to show you it was burning. As important as swatching is, I still don’t like doing it, so my swatch was only 20 stitches on each side and about 4 inches long since I worked the pattern a few different times.

After I had the flame motif worked out, I had to figure out how to make it work on the sock itself. Since it involves an “intro” and “outro” section where the stitch count is less than the main repeat of the pattern, I had to figure out how to handle the making the sock fit the same circumference of leg in those sections. Hopefully I hit on the right balance of increases and decreases - I didn’t get too many questions about it during the KAL so I think so?

The great thing about having this pattern be part of a KAL is there are so many projects to browse to see all the different color combo ideas folks had! If Ravelry is safe to use for you, I hope you’ll check out the different takes each knitter had.

You can get the pattern from any of the links below!

Star Chart is here!

I’m wearing the Star Chart cowl wrapped twice around my neck and holding up one of the wraps in front of my face to show off the marled garter and brioche triangles.

I’m happy to announce that my new infinity cowl, the first in a set of three patterns, is now available on all the usual places! The design and the name were inspired by a set of minis from Ritual Dyes - it came with 12 mini skeins inspired by each of the zodiac signs and I’ve been waiting for the perfect project to use them in since I got it.

Despite my love of socks, I decided to go with an infinity cowl for this design. I think I mostly wanted to be able to show off all of the colors at any given moment, depending on how I wrap the cowl. (With socks, there’s just no way to avoid having something hidden inside the shoe!) And, for whatever reason, I’ve been really feeling a need to marl all the things lately. Marling 2 fingering weight yarns means DK-worsted weight, which is convenient both for strain on my hands and speed of knitting up, but I wanted a little SOMETHING fun to look forward to with each color (besides getting to knit with it, of course). And marling can sometimes obscure the color (on account of the marling). Thus…I settled for 2 color brioche!

Two version of the cowl (one with a cream background color and minis in rainbow order, the other with an almost-black green background color and minis in zodiac order) are hanging from a tree branch.

I didn’t want to do a whole increase/decrease round thing, and since I already had the 2 colors ready to go, I figured, why not split them up for the brioche sections? The gauge is pretty similar after all. And because I can’t leave well enough alone, I wanted to use short rows to make triangular wedges of brioche rather than rectangles. Also, the original design I was toying with was focused on alternating triangles that I just couldn’t make work as intended, so this KIND of achieved that, though in a totally different way. Small victories!

On account of the brioche and the short rows, this pattern is on the intermediate-advanced end of the scale. However, don’t let that discourage you! If you’re new to brioche, it’s just a technique you haven’t learned yet. And I’ve included tutorials in the pattern made by brioche-queen Sosu (Susanne Sommer), so you’re in excellent hands for picking up this new skill.

I’d love to see this design in a variety of color choices - obviously it’s ideal for that endless and beautiful collection of fingering weight scraps and partial skeins I assume everyone else also has, but it’s great for half-vent sets (or those new-fangled Halloween advents, which are also ingenious and perfect!), or even two full skeins! The right side will showcase all your myriad scraps, but it’s reversible thanks to both garter and brioche, so you can always pick which side to show off.

You can get the pattern below, or scroll farther for links to the entire collection!

Links to the collection:

Wonder Walking

One of the things I’ve been doing this year while quarantining is taking lots of walks. I live near a quiet neighborhood, and as such I like to walk up and down the streets off the main traffic road to avoid traffic noise and other pedestrians. I spend a not-insignificant amount of time admiring the fancy ($$) houses and expansive yards, and my favorite thing to do is find small, magical things while out walking. It’s usually pretty flowers, but sometimes it’s an interesting pattern in the sidewalk, a cute animal, or delightful decorations (especially true during October!). I also love a good street couch.

Looking for weird and/or delightful things to take pictures of has always been a hobby of mine, but I recently encountered a term that describes it so perfectly, I won’t be able to think of it as anything else now! That’s “wonder walking,” and I encountered it while admiring Amy T Won’s art on her instagram. You can get her full description of the practice from her social media, but I hope the next time you take a walk, you keep an eye out for the miniscule and mundane!

I’ve put some recent pictures below. Left to my own devices, this would be an infinite scroll! If you want to see more, you can find my non-knitting photos at @darlingsan on instagram.

Chocobo Racer is here!

After much teasing regarding the colorway and inspiration for this pattern, the day has finally come!

Two feet wearing handknit socks in warm yellow yarn with brown and orange speckles. A lace pattern that looks like feathers rings the cuff, and a different lace pattern wanders down the outside instep of each foot.

Chocobo Racer, inspired by chocobos from Final Fantasy and shown in the lovely color “Golden Chocobo” from Shipyarn, is now available on Ravelry and Payhip. I’ve also created a Low Vision Attribute version based on the guidelines from the Accessible Patterns group on Ravelry. That version has 24 point black sans-serif font (Arial), 1” margins, and only the written instructions for the charts.

You can also get one of a limited number of kits, which include a skein of yarn in the Golden Chocobo colorway and a copy of the pattern, from Shipyarn’s shop.

This pattern was a collaboration project with V, the mastermind behind the fandom-inspired colorways at Shipyarn. She wanted to expand her yarn base selection to include a fingering weight yarn, and I not-so-subtly insisted that it should be appropriate for socks. Because socks.

The same lacy socks on blue sock blockers, displayed on a wood floor, with a skein of the yellow yarn in a swirl next to them.

We tested a few different options, and ultimately she went with a 100% polwarth base. I feel like I only recently heard about/came into contact with polwarth, so if you’re also new to it then you should know that it’s actually a variation from merino, and was developed to be hardier while still maintaining softness. Shipyarn’s polwarth base isn’t as soft as a merino/nylon blend at first blush, but it softens with wear and washing AND has great stitch definition and sturdiness. 5/5 would recommend!

Since the inspiration was the majestic chocobo, I felt the pattern needed some kind of avian flair. The lace on the cuff looks like a ring of feathers, which is delightful, but my absolute favorite part of the design is the lace panel that traipses down the leg. The intermittent and constantly-moving clusters of yarnovers make me think of footprints (or bird tracks) in sand, as if a very indecisive bird scuttled this way and that, trying to figure out which way to go. With that mental image, I knit the sample very quickly!

Get this pattern from Ravelry or Payhip with the buttons below. As with all my patterns, it will be offered at 15% off for 1 week after release.

Make a helper foot for socks

How do you measure socks when knitting? I’ve seen lots of tutorials that involve simply putting on the sock WIP and measuring it against your actual foot and I’ve seen lots of photos of very nice “sock rulers” that can be bought but not necessarily customized to your actual foot.

I typically take my knitting with me on my commute, so pulling off my shoes in order to try on an in-progress sock is not an option for me. Instead of buying a generic sock ruler, I decided to make one exactly customized for me:

You’ll need:
  • sturdy cardboard or posterboard

  • a pen or marker

  • a helpful friend or decent flexibility

  • an actual ruler

  • scissors

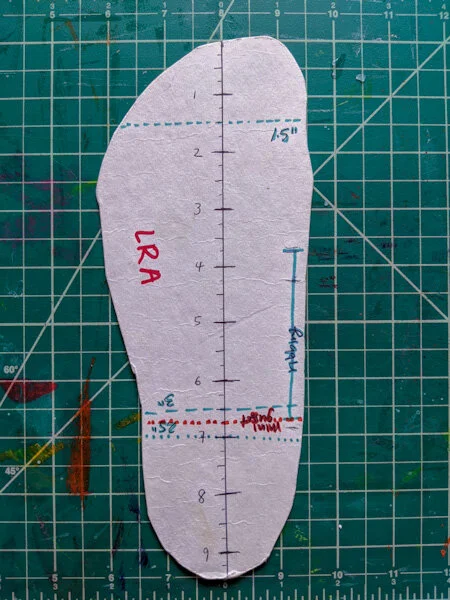
Close-up of the heel part of the cardboard foot. Two dashed lines indicate 3” and 2.5” away from the end of the heel. A line at 2.75” is labeled “mini gusset.”

Now you can pull out your “foot” wherever you are and get a quick measurement! This works for both toe-up and cuff-down patterns, and also makes it easy to see the stitch pattern stretched out like it would be across the instep. If you make them for folks you frequently knit socks for, don’t forget to label them!

Do you have a foolproof method for measuring your socks? Tell me about it on comments!

A cardboard cutout of a foot placed next to a ruler. The ruler is being used to add measurement marks to the cardboard.

The steps:

First, place your dominant foot on the cardboard and put weight on it. Have a friend trace the shape of your foot onto the cardboard. Cut out the foot shape (it’s fine and probably preferable to make the toes rounded like a mitten rather than have a scalloped edge).

Take your ruler and draw a line down the center (long-ways, from toe to heel), then add in ruler measurements. I went ahead and added notations for measurements I typically see in sock patterns, such as where to begin a fleegle/strong heel gusset, mini-gusset, short-row heel, or toe decreases. (Your specifics may vary - use whatever makes sense for the size of your foot and the types of sock patterns you normally knit!) I also added a measurement for ribbing on the arch of my foot. If you have modifications you find yourself making time after time, throw them on there!

Close-up of the toe of the cardboard foot. A dashed line indicates 1.5” from the end of the toe.
The finished helper foot displayed on a green lined backdrop. In addition to the measurement lines on the heel and toe, there’s a vertical line at the arch of the foot labeled “ribbing” and the letters “LRA” written along the blade of the foot.

Perfect corner pick-ups for mitered square blankets

Those of you who’ve seen even a little bit of my knitted FOs know that I’m a complete sucker for rainbows!!! And I’m currently undertaking that ubiquitous step on my knitting journey of...knitting the Hue Shift Afghan.

This pattern is written by and published by Knit Picks. They have some pre-made kits for sale, but you can also swap colors in and out to create your own color palette. (This isn’t a sponsored post or anything, I just think that’s cool!)

One of the most common modifications I see for this pattern is working only the center spine CDD stitch as always-stockinette (so, purling it on the WS), rather than garter stitch. This creates a really clean diagonal line across each square, and, for me anyway, makes it easy to know when you’ve hit the center stitch and need to work the CDD.

When adding a new square to the blanket, it’s possible to pick this CDD stitch up in such a way that the line of stockinette center stitches continues across all of the squares! It only took me, oh, 30 squares or so to get it right, so I want to share it here for posterity.

I work the center stitch as a CDD on the right side and a purl on the wrong side, which means the center spine is comprised of two stitches in each color for the striped squares. I think the striped squares make what I’m describing easier to see, so I’ll use those as my example.

You’ll either be casting on or picking up stitches on the way to this CDD stitch, so do those as you will. I personally slip the stitches at the end of each row with yarn in front, then work them at the beginning of the subsequent row, so there’s an easy-to-see-spot to pick up from.

Close-up of corner of striped mitered square; the focus is a column of knit stitches (CDD stitches) alternating between 2 blue and 2 orange. The second-to-last orange stitch is the target for picking up stitches.

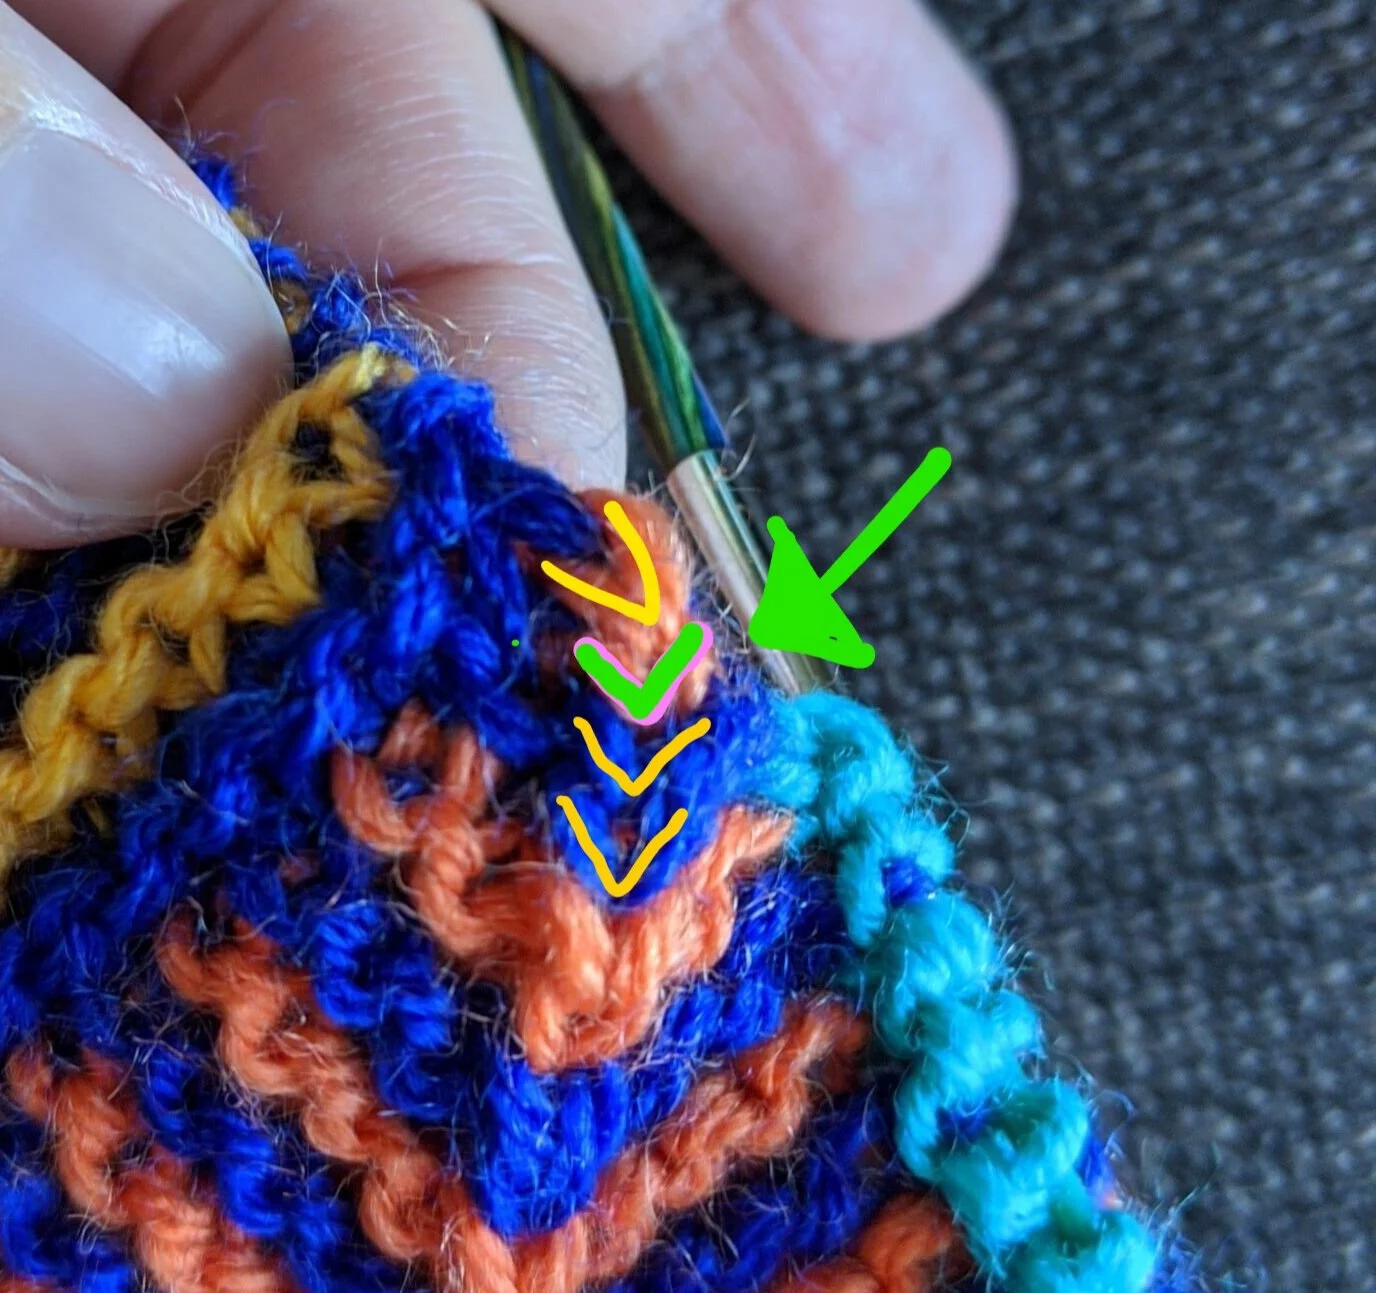
At the CDD stitch, you’ve likely used that final stitch as the first stitch for your next square, so the center spine is sort of pulled up and around. To avoid a curvy blip in the line of spine stitches, be sure to pick up the LOWER of the last 2 CDD stitches. And by this I mean, knit into the center of it, as if it were a knit stitch still on the needles.

Same photo as above, but the top 2 blue and orange knit stitches have been highlighted in yellow. The second-to-last orange stitch has a green arrow pointing to it.

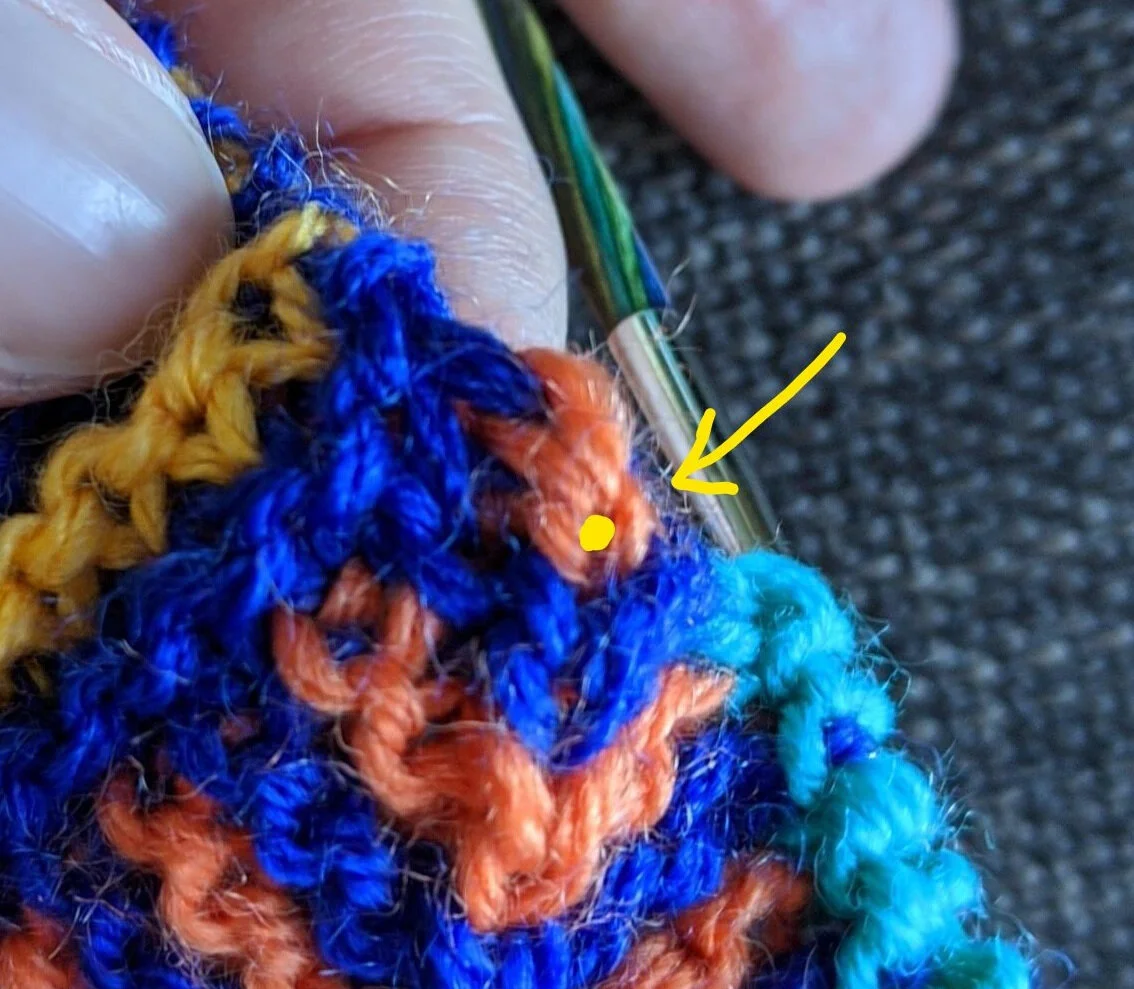
A close-up of where to insert your needle when picking up this stitch:

The same image as above, but this time a yellow dot is in the center of the lower of the 2 orange stitches, indicating where to insert the needle when picking up the stitch.

Here’s what it looks like when everything is all nice and neatly picked up! You can see that it looks like the turquoise stitch grows out of the CDD used in the pickup. (You can also see a little bit of the final red stitch that was ignored peeking out from behind the turquoise stitch)

The same corner of the mitered square, this time with a row of turquoise stitches across the top, with a fresh column of CDD stitches growing seamlessly out of the one from the preceding square.
Close-up of another join between 2 mitered squares where the CDD line doesn’t continue neatly because I picked up the stitch in the last of the two orange stitches rather than the second-to-last.

For completeness, here’s a picture of a square I added where I picked up the last of the purple stitches, rather than the second-to-last, and it looks a little wonky. The last purple and the first turquoise both seem to slant awkwardly to the left, and the line of CDDs has a little zig. Ultimately it’s not a HUGE deal to me, but I feel like part of the delight of making things by hand is paying attention to the tiny details like this!

Black lives matter link round-up

Anti-racism resources for white people

Has a great round-up of books, articles, videos, podcasts, etc, for white folks in particular. If you find yourself saying “I don’t feel qualified to speak up about this issue, but I want to listen and learn,” then this is your curriculum.

Justice in June

Educational links, organized into 4-week “courses” of 10, 25, or 45 min/day spent on the material. It pulls material from other sources into a curriculum-like structure.

More anti-racism resources for white people

A tiered system that takes potential white allies through steps of identifying and unpacking race and privilege, with educational resources and checkpoints at each step.

Take action for Black Lives Matter

Don’t just listen and learn - even if you don’t feel ready to write a dissertation you can donate time or money. This site has email addresses and phone numbers for where you can contact to demand justice - they even provide templated scripts so you can make all the relevant points without getting flustered!

Other ways to take action

Check out this list for even more ways you can educate yourself and take meaningful action

Anguish and action by the Obama Foundation

Links to educational info and avenues for action

Campaign Zero

Dedicated to ending police violence and providing alternatives for the community

26 ways to be in the struggle beyond the streets

Pretty self-explanatory

Ravelry’s link round-up

Has a focus on promoting and supporting queer Black folks as we are now in Pride month

30 Flirty Film tinyletter link roundup

Background info, links for donating, and links for learning and acting

I’ll be updating this post as I find more links - please feel free to share any in comments.

Little Bits Beanie is here!

LBB 9.jpg

I’m happy to announce my first hat pattern is now available on Ravelry! The Little Bits Beanie was designed at the request of my partner, who needed a new hat to replace his well-worn and very hogged-out commercial knit hat. He wanted something neutral, but was open to some color, which turned out great because I have a LOT of fingering-weight scraps.

I picked Knit Pick’s Hawthorne partially because it feels less “warm” to the touch than something softer like a merino blend and partially because I have a fair amount of it in gray. The gauge is pretty loose, because Hawthorne is already an exceptionally dense yarn (100g = 400 yd / 366 m), and because he didn’t want a warm hat so much as a fashion hat. The scraps I picked were mostly of the lighter fingering weight variety, but the stripes are short enough that it’s not noticeable.

The original sample was knit with a nice long ribbing, but when I had him try it on he said he wanted a snugger brim, so I dropped another needle size and opted for a folded brim, which creates even more negative ease on account of being double-thick fabric. As much as I hate the joining round on a folded brim because it’s so fiddly, I loooove how they look! Plus, it’s so decadent to have the nice and smooth knit side against your forehead. Having tried both types of brims, I figured both could stay in the final pattern.

LBB 2 resize.jpg

For the stitch pattern on the hat itself, I spent many weeks waffling about it. I was originally trying to find something with slipped stitches, possibly slipping stitches with yarn in front to really enjoy the different CCs throughout the hat, but I eventually gave up on that idea because the slipped stitches might cause the stripes to pull or pucker differently than the rest of the hat. The pattern I eventually settled on was simple, but depending on whether you use the MC or the CC to make the purl stitches, it looks pretty different! Thus, another choose-your-own-adventure element was added. I’d love to try this same stitch pattern, but all over the hat rather than in stripes, just because the more repeats you do, the more it starts to look like a lattice (to me anyway).

The crown shaping incorporates another of my favorite techniques - the CDD. Not only do I like the look, but I like the efficiency of taking care of 2 decreases with one stitch! Working CDDs with stitch markers all mixed up in the stitches is a pain in the butt, so if you’re interested in trying it without stitch markers, I wrote a tutorial that will hopefully help!

Learn to read CDDs and kiss your stitch markers goodbye!

I really love the stacked look of the centered double decrease (CDD), and when working crown decreases on a hat, I also like being able to combine the typical 2 decrease motions (k2tog and SSK usually) into 1 movement.

First, a refresher. The CDD is worked like so:

Slip next 2 sts together knit-wise. Knit 1. Pass 2 slipped sts over this stitch.

However, the nature of how CDDs are constructed means that, when you’ve placed markers indicating where the decrease should be worked, you can’t simply say “knit to 3 before marker, CDD, repeat,” as this would result in a weird diagonal. You have to place the stitch marker in the middle of the stitches that will be worked in the CDD. With a stitch marker involved, the CDD instructions would be more like:

Knit to 2 before marker. Slip next 2 sts together knit-wise. Remove marker. Knit 1. Pass 2 slipped sts over this stitch. Replace marker.

Kind of fiddly!

By learning to read the CDD stitch in your knitting, you can avoid the need for placing markers entirely, and live dangerously! This is how I knit the crown on my Little Bits Beanie, and I hope it helps you knit yours too.

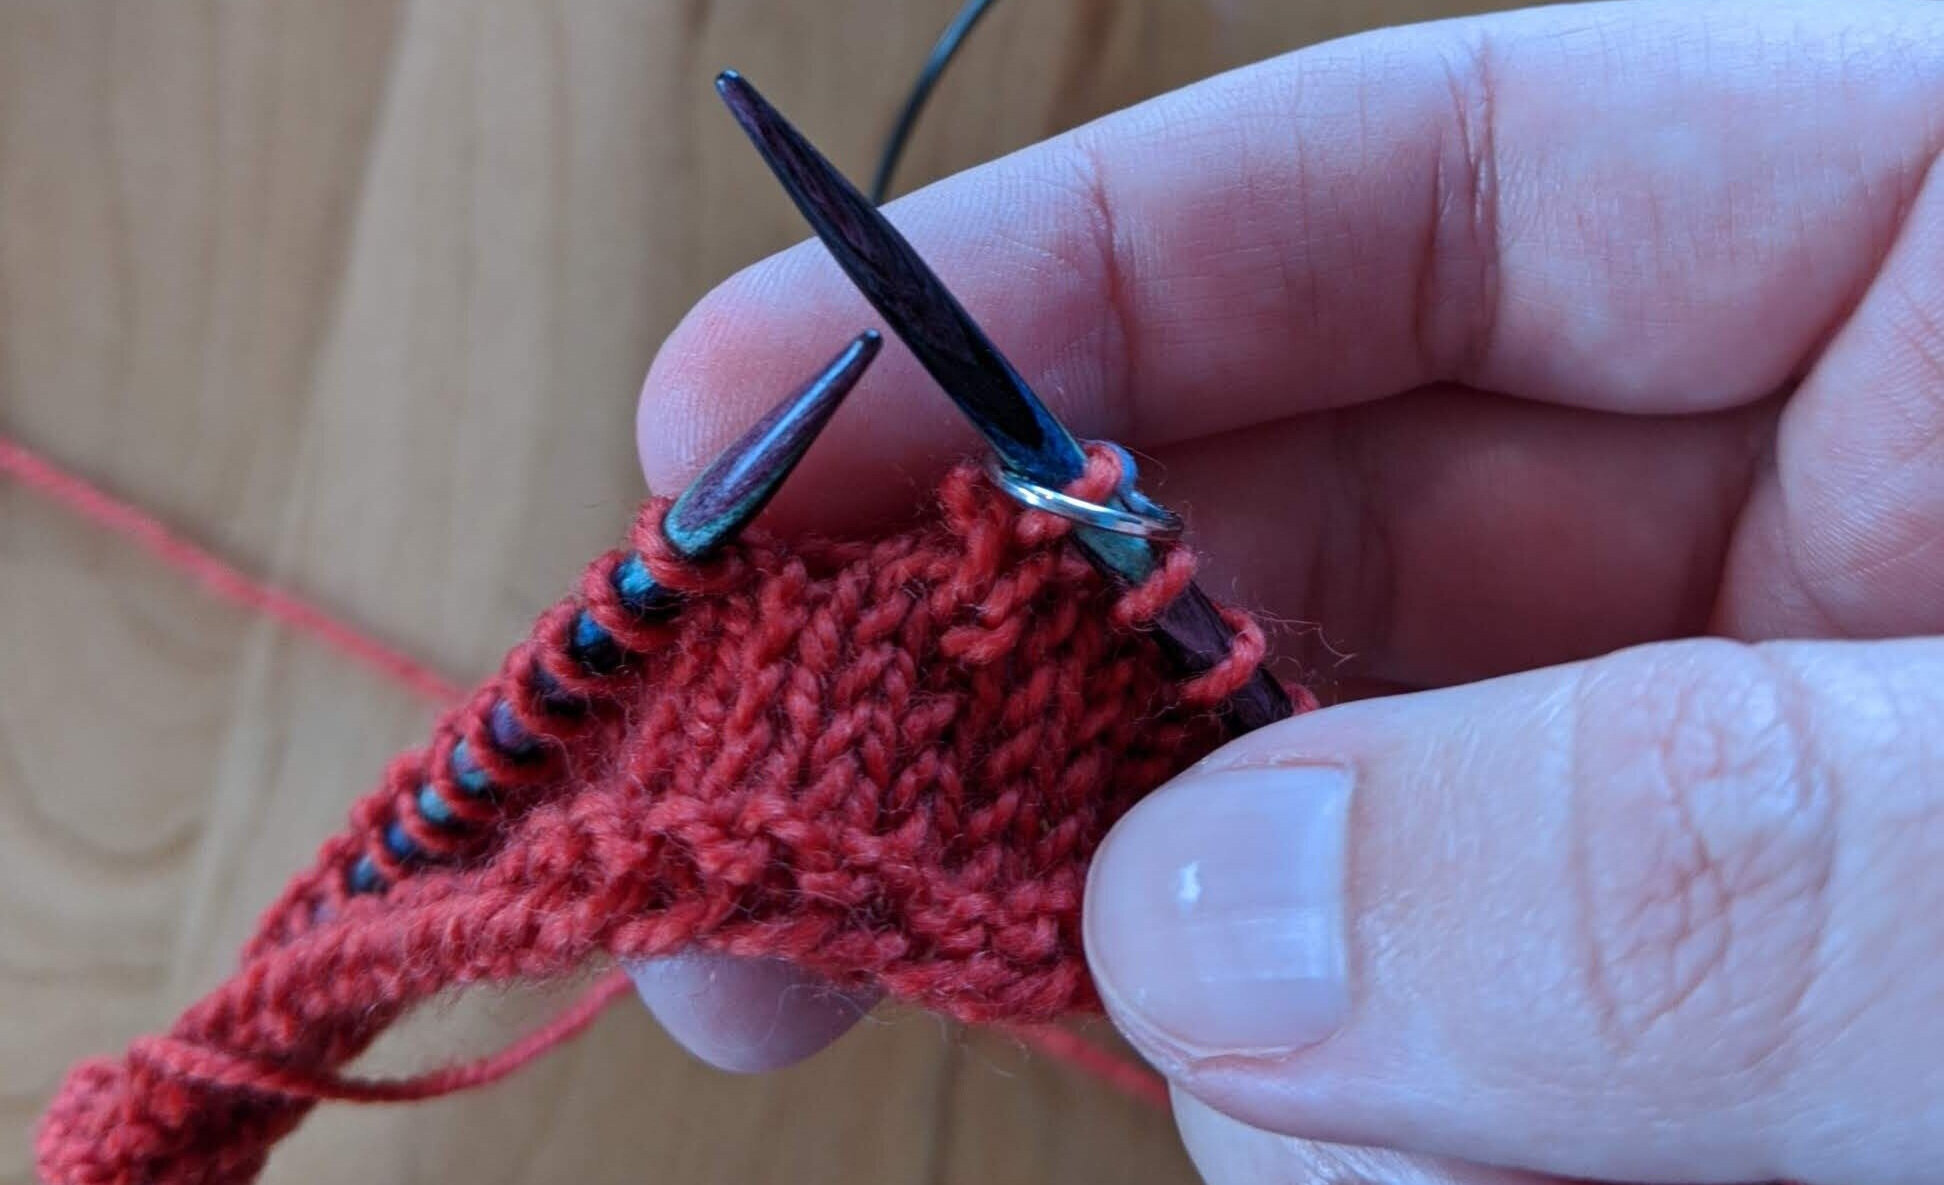
Let’s look at some photos to get a sense of what’s happening. Unfortunately, there is no way to avoid the set-up round and the initial placing of markers to mark the sections of the crown of the hat, so you have to work that round. Here we are on the next round, knitting to 2 stitches before the marker. Keep in mind that the stitch just before the marker will always be the center stitch of the CDD.

Knit to 2 stitches before marker

Knit to 2 stitches before marker

Slip the next 2 sts knit-wise:

Slip the next 2 sts knit-wise

Slip the next 2 sts knit-wise

Remove marker and knit 1:

Remove marker and knit 1

Remove marker and knit 1

Pass 2 stitches over the just-knit stitch and replace marker after the CDD:

Pass 2 stitches over the just-knit stitch and replace marker after the CDD

Pass 2 stitches over the just-knit stitch and replace marker after the CDD

In the early stages of crown decreases, you’ll likely have a rest row in between decrease rows. So, here we come back to the CDD, having worked the rest row. We’re ready to work another decrease, so we stop 2 stitches before the marker again.

Ready to work CDD the second time

Ready to work CDD the second time

Let’s take a look at it without the marker:

2 stitches before the marker, but there’s no marker!

2 stitches before the marker, but there’s no marker!

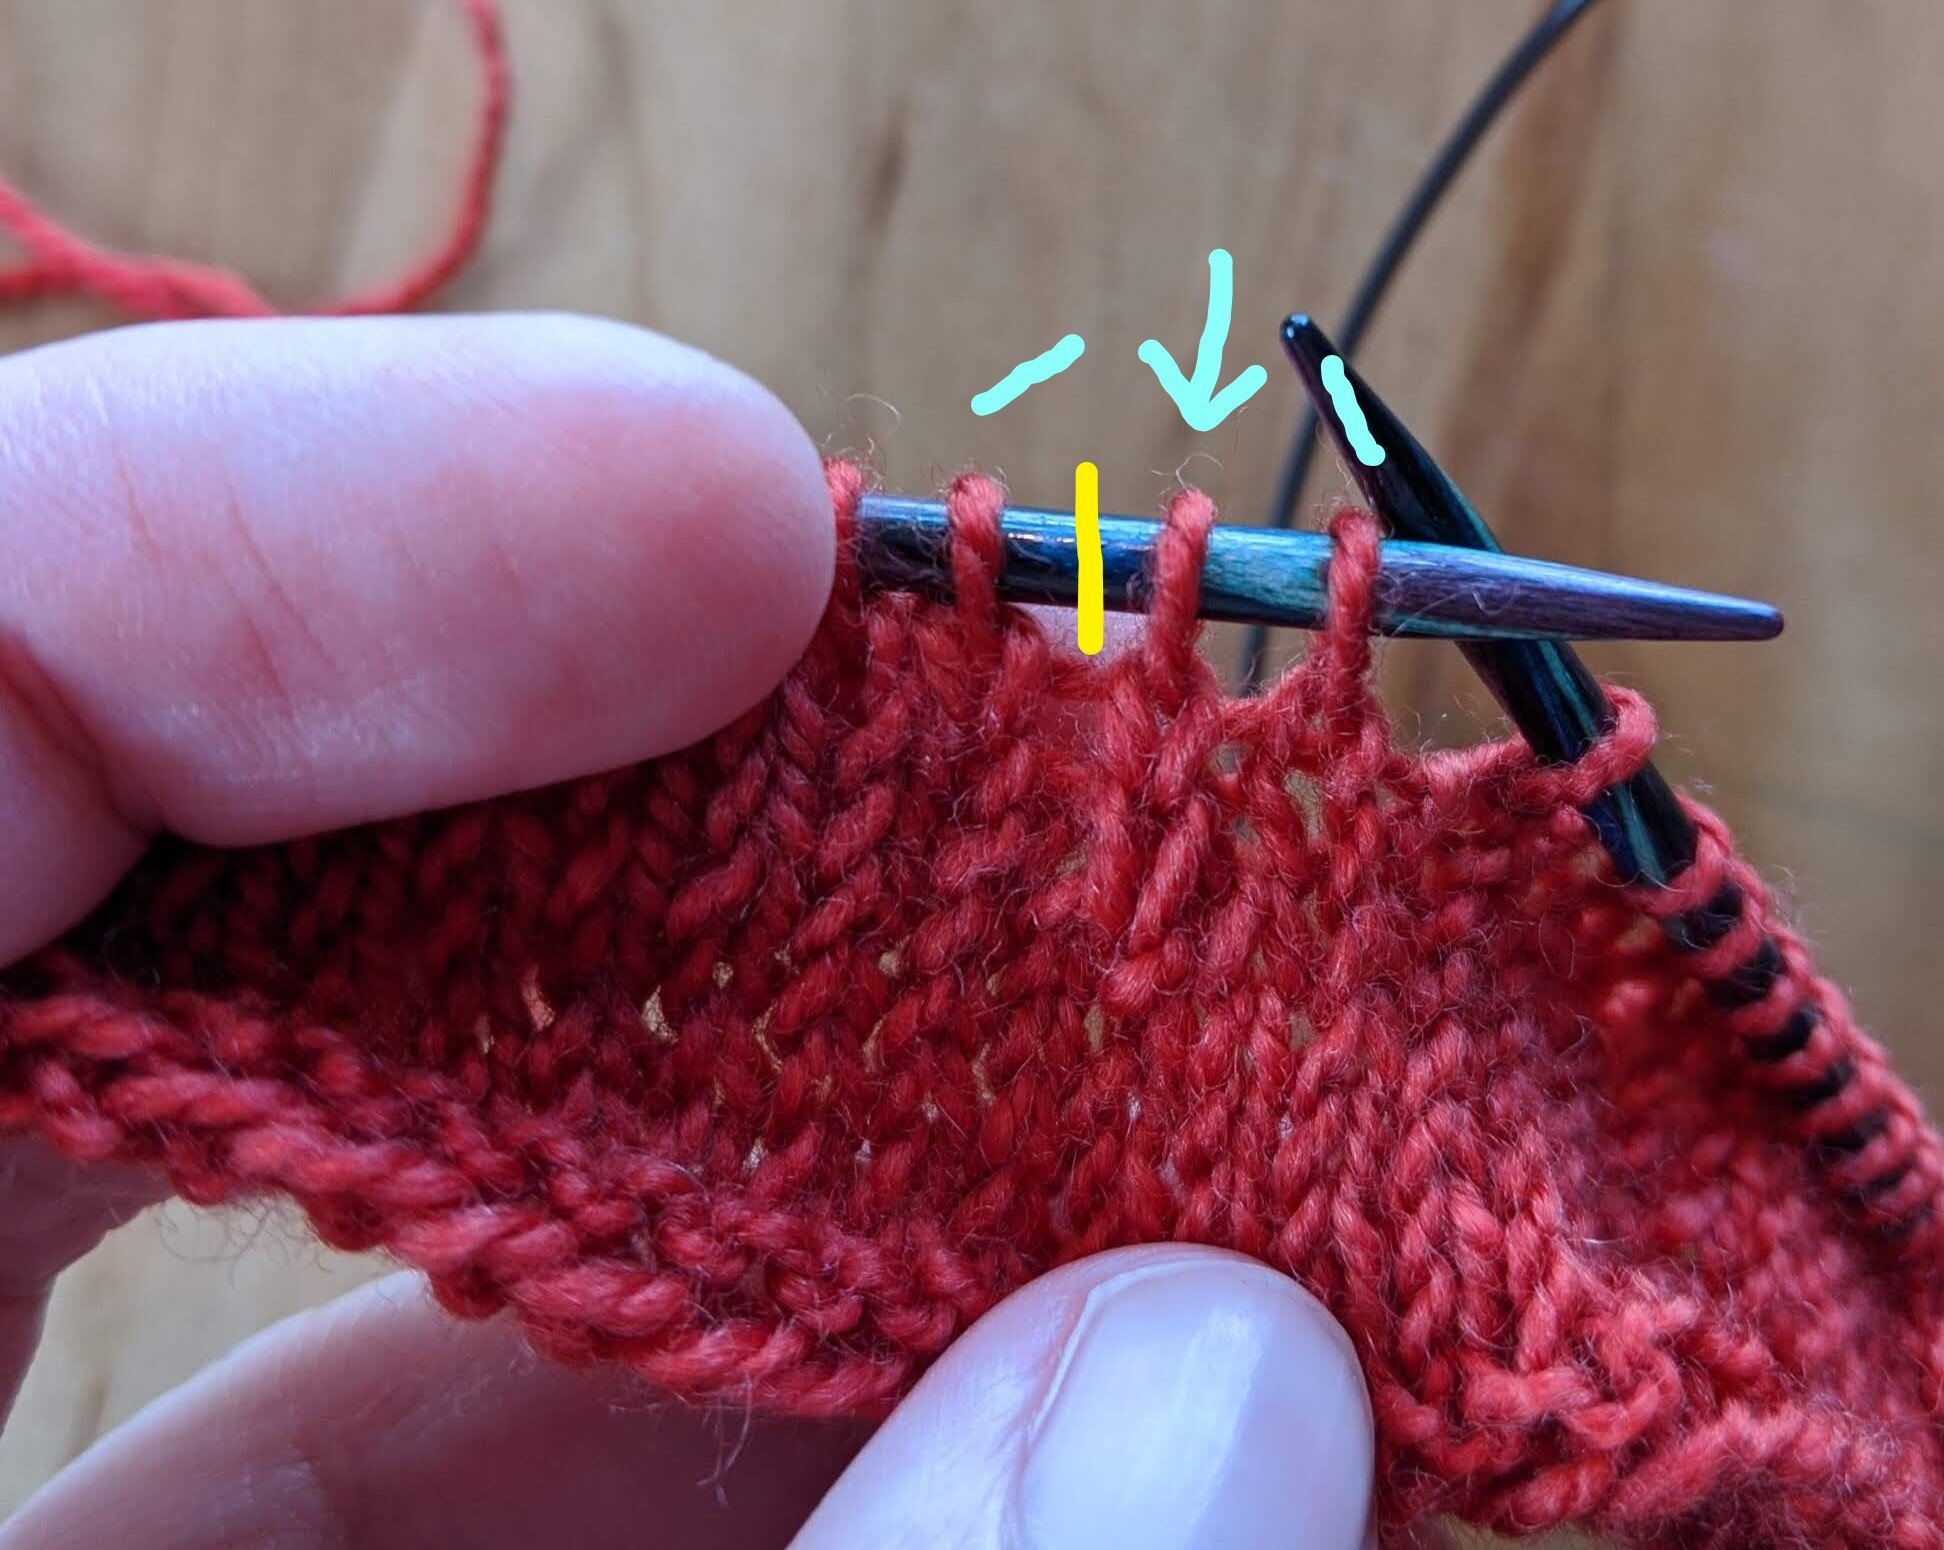
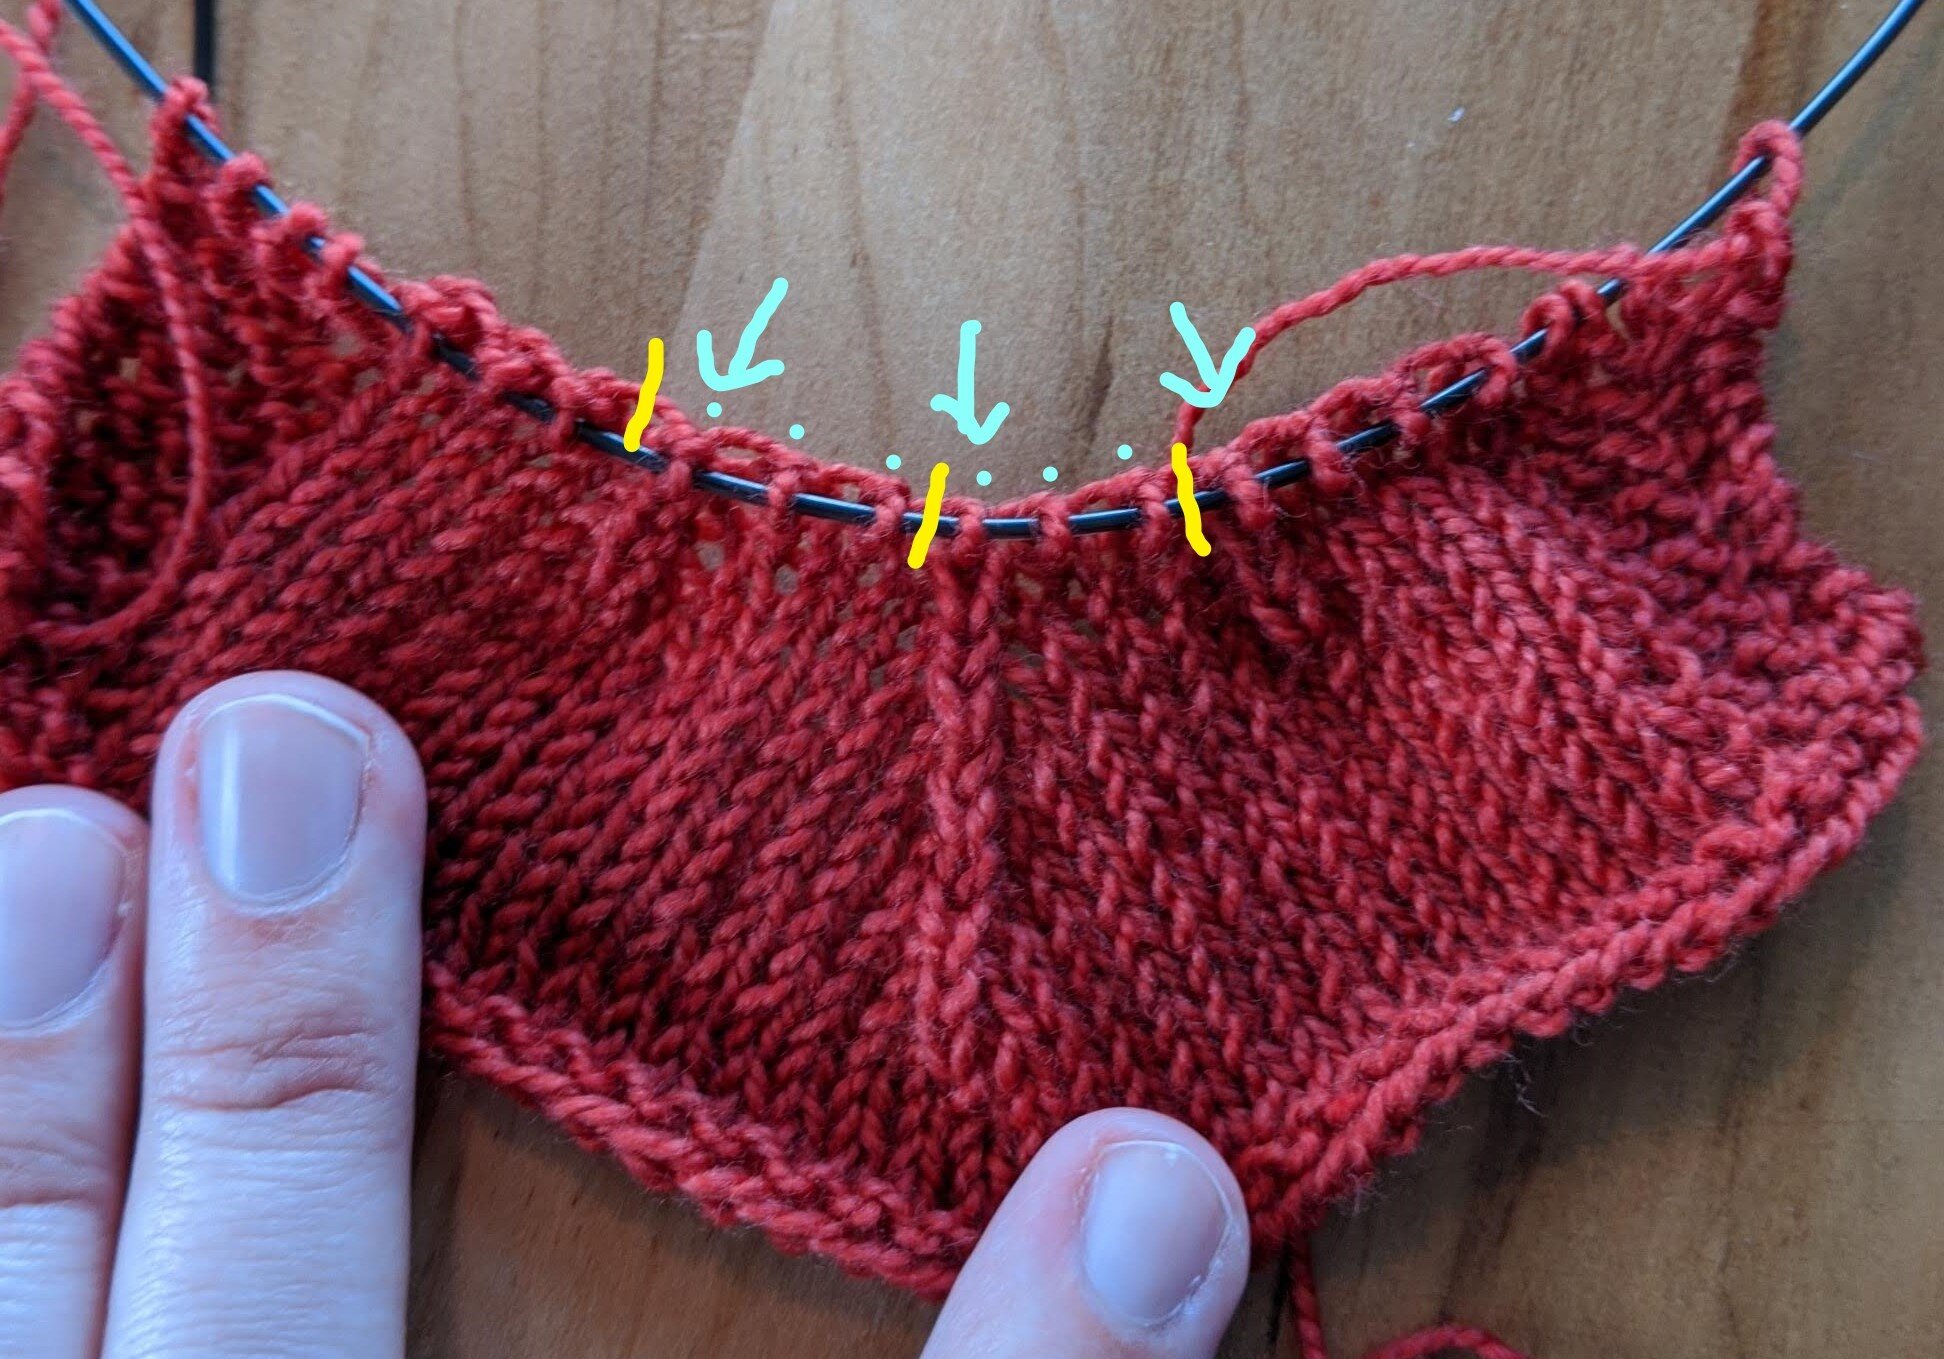
You can hopefully see the CDD stitch, which stands up above the surrounding stitches because it’s got 3 stitches all stacked on each other underneath. This column of stitches will always be the center of the 3 stitches involved in the CDD. Thus, if basing your counting off of this visual, you’d stop when you have 1 stitch + this CDD stitch, then begin the “slip 2 together knit-wise.”

The center stitch of the CDD is marked with an arrow, and the neighboring 2 stitches that will be decreased are marked with light blue lines. The yellow line is where the marker would be.

The center stitch of the CDD is marked with an arrow, and the neighboring 2 stitches that will be decreased are marked with light blue lines. The yellow line is where the marker would be.

Here’s what it looks like once you have a stack of CDDs, including a few nearby as they slowly converge at the crown of the hat. Remember where the stitch markers are supposed to be with regard to the CDD stitch? Can you tell how many stitches there are “between markers”?

A stack of CDDs in the center with two CDDs converging on it to the right and left.

A stack of CDDs in the center with two CDDs converging on it to the right and left.

Here’s the same image, but with guidelines. The blue arrows indicate the 3 stacks of CDDs. The yellow lines indicate where the stitch markers would be. The blue dots show that there are three stitches between markers at this point. When counting stitches, count the stitches between the CDDs and include ONE of the CDDs in the count. In the case of the Little Bits Beanie, the CDD is at the end of each section, so you’d count from the BOR marker to the first CDD - that’s one section. Then, count from the stitch just after this first CDD to the next CDD, and so on, to ensure all sections have the same number of stitches.

8 multiple cdds guidelines_jpg.jpg

Hopefully this helps you ditch the stitch markers and work CDDs with reckless abandon! If you have any questions, or anything is unclear, please feel free to leave a comment below.